Blog, PolyUtilities, Projects
Guide to Install and Use PolyUtilities for Perfex CRM
Thank you for choosing PolyUtilities module for Perfex CRM. If you have any questions that are beyond the scope of this help file, please feel free to email us via contact form here.
...
Demo of PolyUtilities features:
Site: https://perfexmodules.wikipoly.com/admin
Upload & active module
Steps of Installation
- Extract your downloaded file contens. You will notice a folder called “documentation” and a new zip file, called “poly_utilities.zip“.
- “poly_utilities.zip” contains the module files (in a module format) that you upload in Perfex CRM’s Modules installation section.
- Go to your Perfex CRM’s Admin area and select the following menu item: SETUP > MODULES.
- Select the extracted poly_utilities.zip at Module installation selection prompt and press INSTALL.
- Find the module named PolyUtilities and click Activate. You will be told that module is successfully activated.
Now you can begin using the module by accessing the menu named PolyUtilities.
Video Demo
How to use PolyUtilities module
Feature Support
- Custom menu (custom links for perfex crm).
- All-in-one Support for Clients.
- Widgets.
- Search menu for Perfex CRM.
- Collapsed icon-only Sidebar Menu.
- Support Ctrl+S to save content while composing: Contracts, Projects, project notes, Articles.
- Support Table of Contents for quick access to content headings during composition.
- Support integration of additional custom JavaScript, CSS codes in the admin, clients, or both sections.
- Support creation and management of Quick Access Menu and shortcuts to access features, links, or usage.
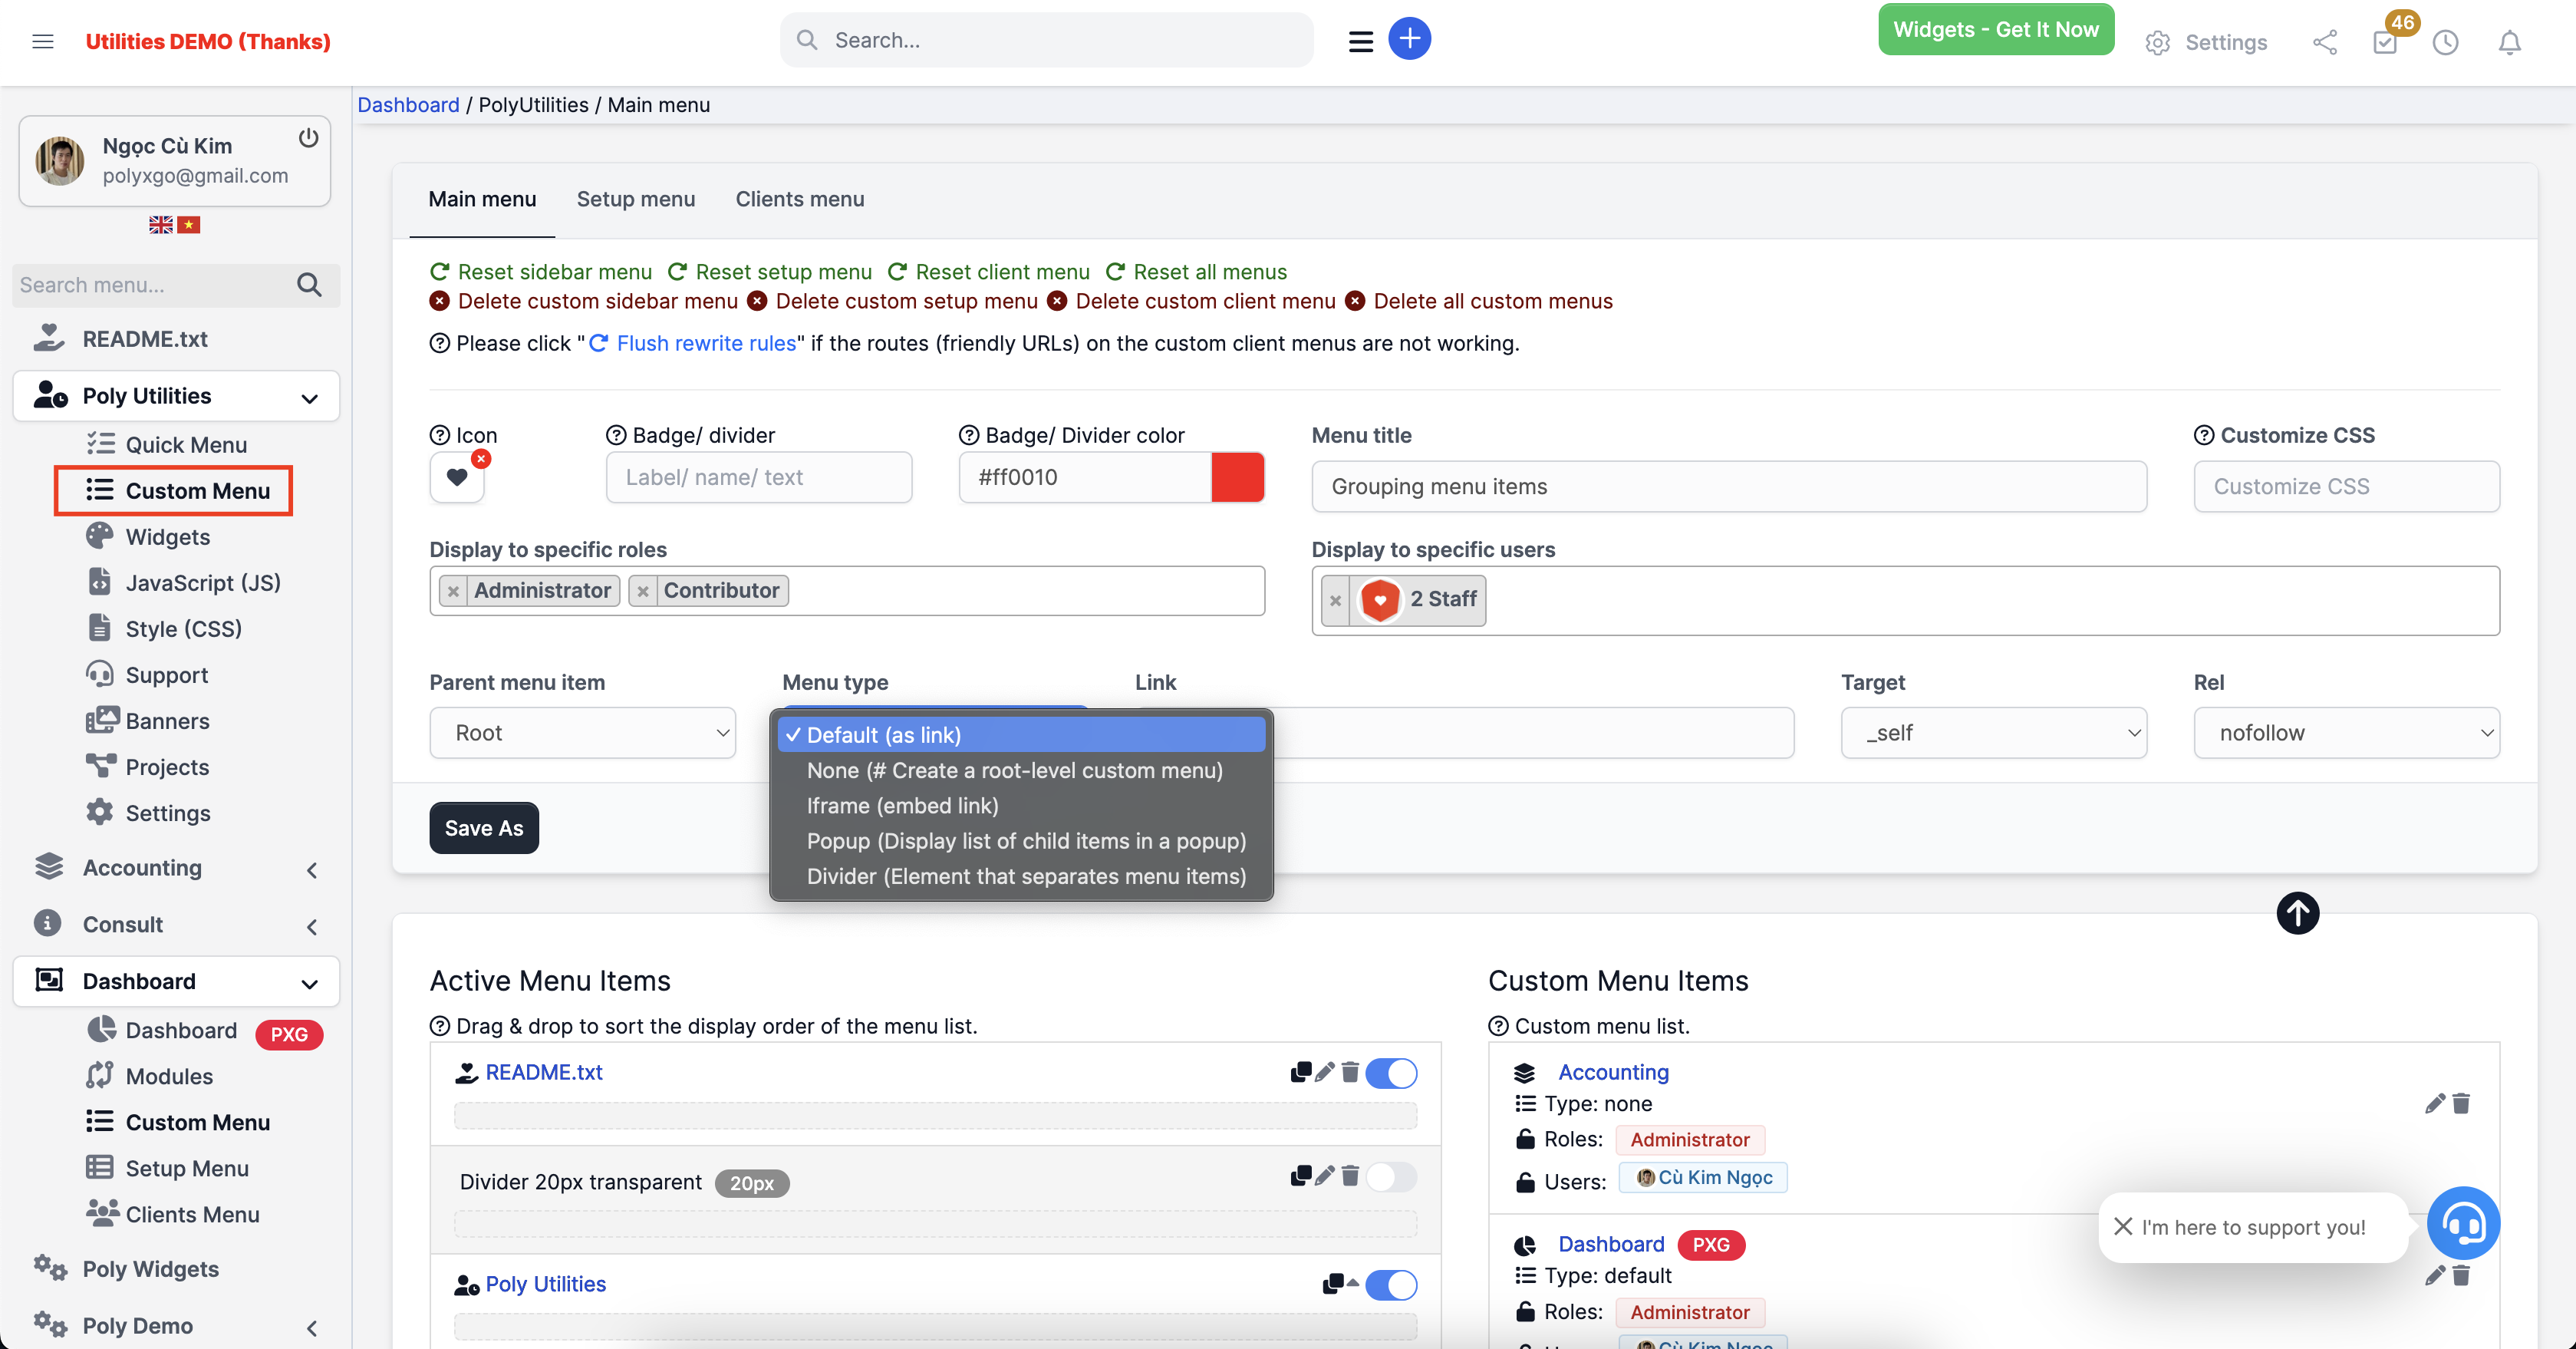
Custom menu – Custom links
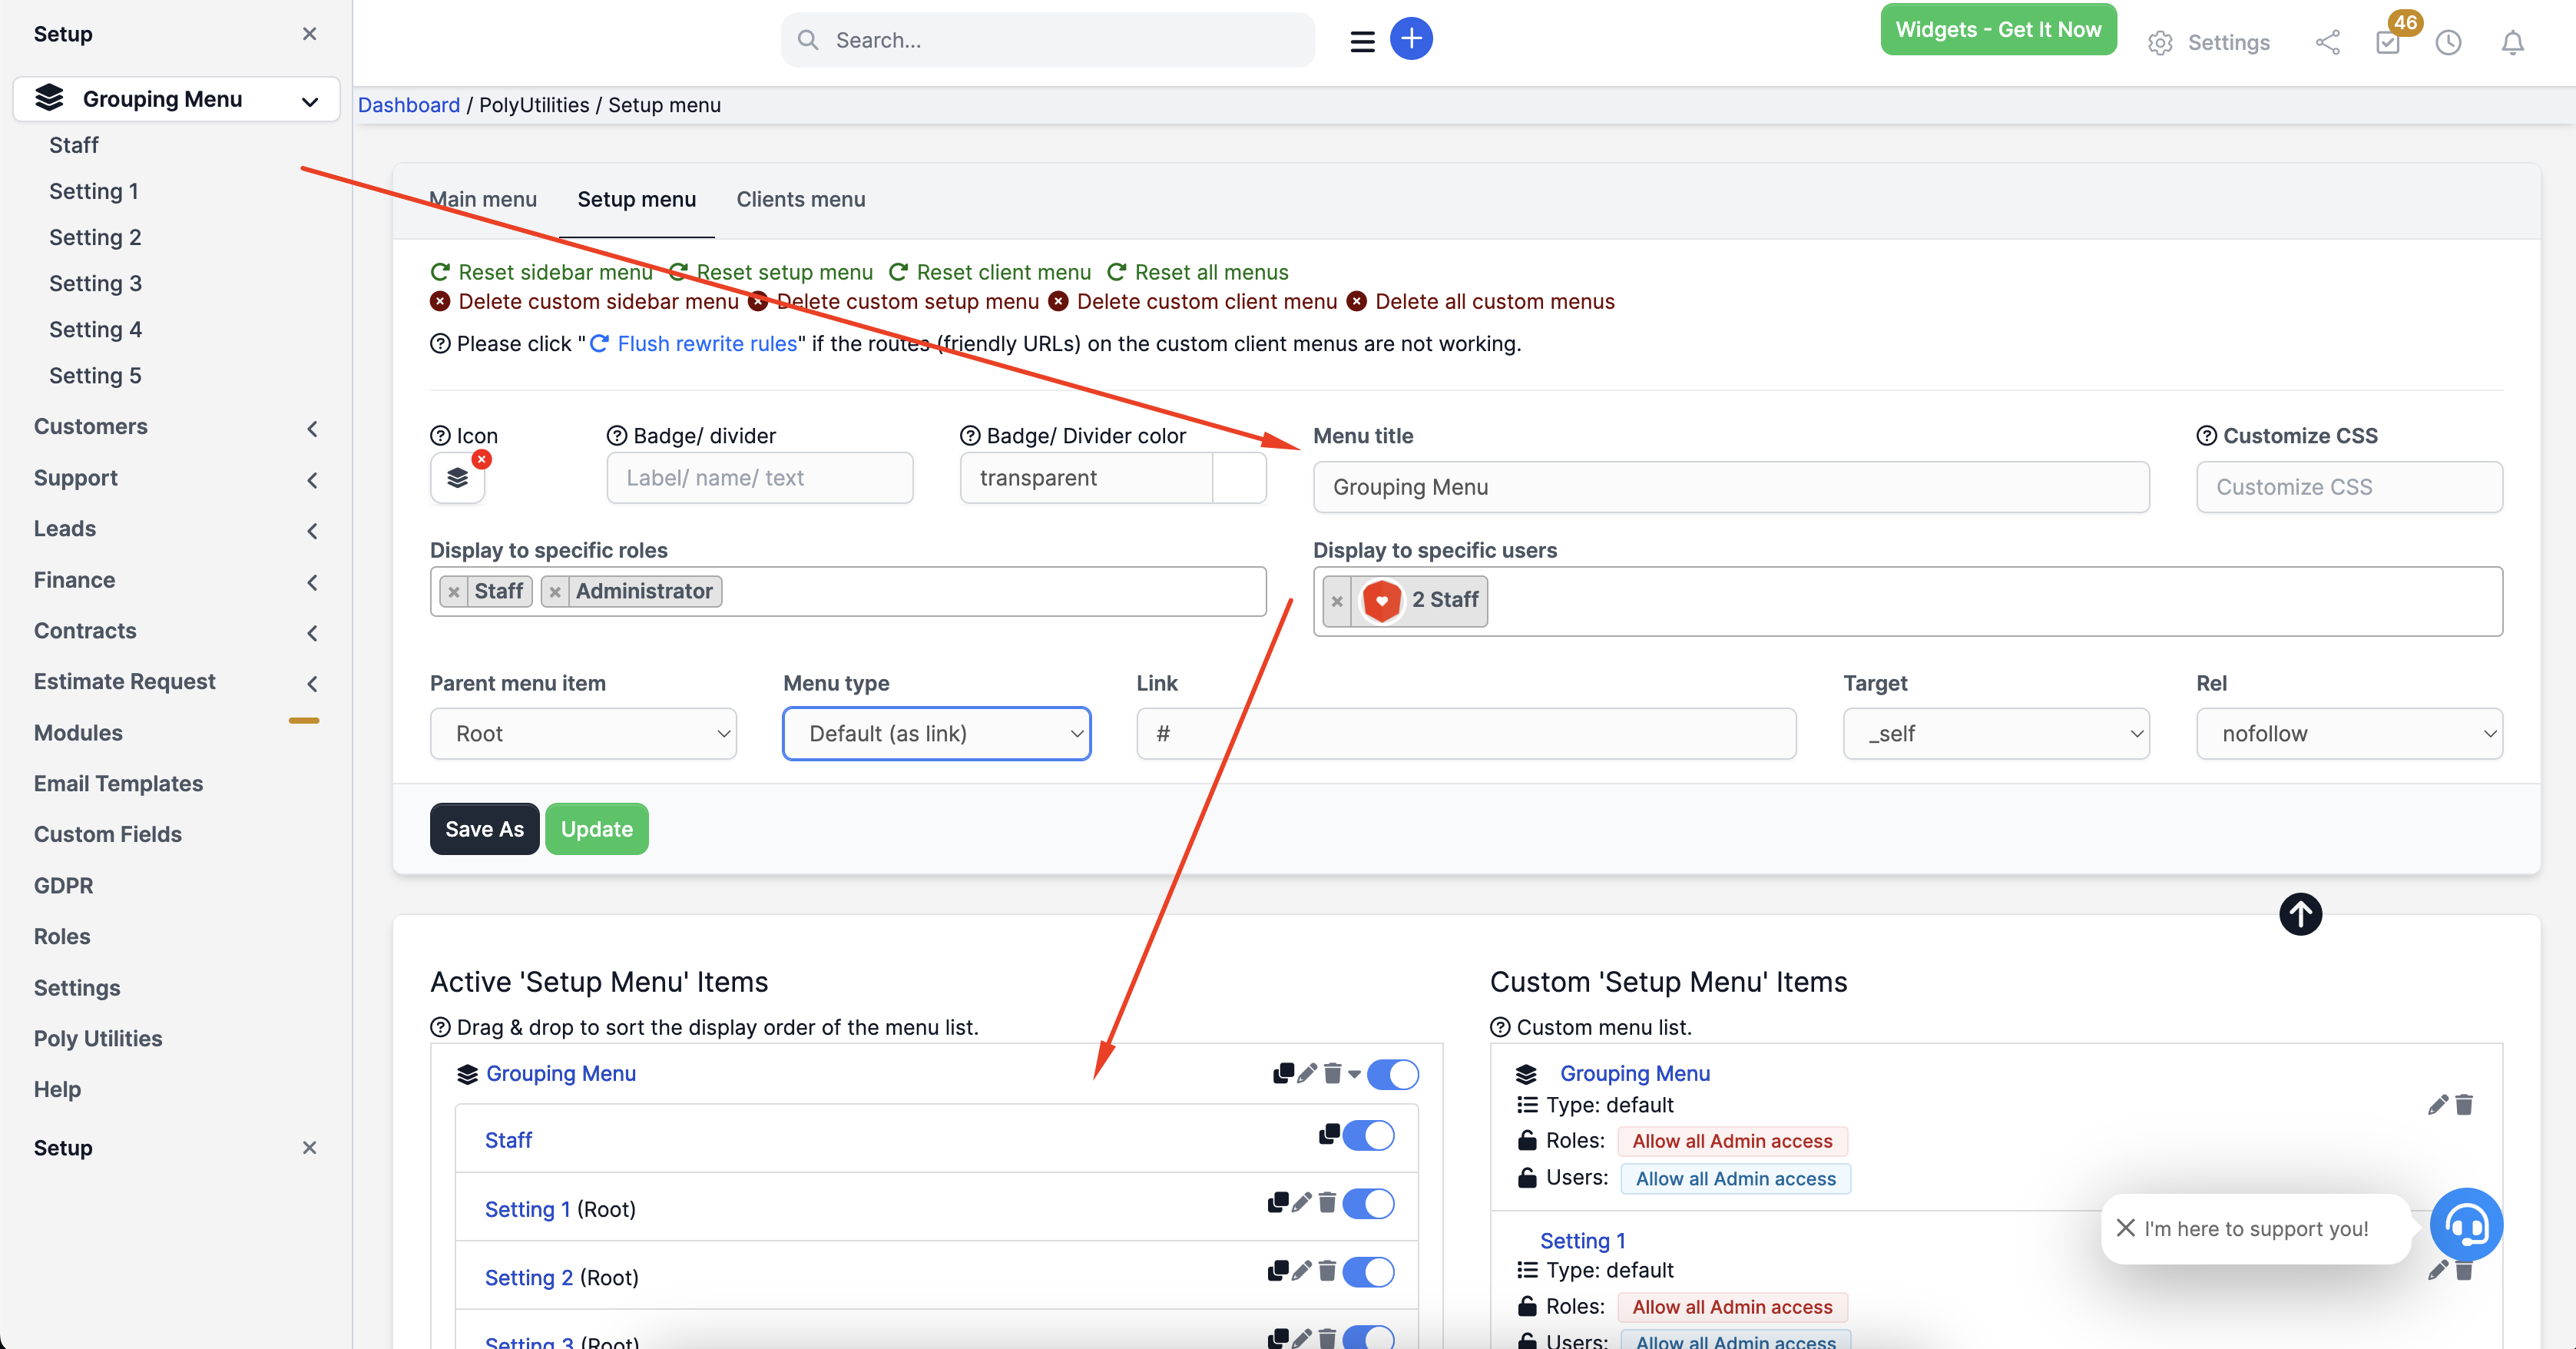
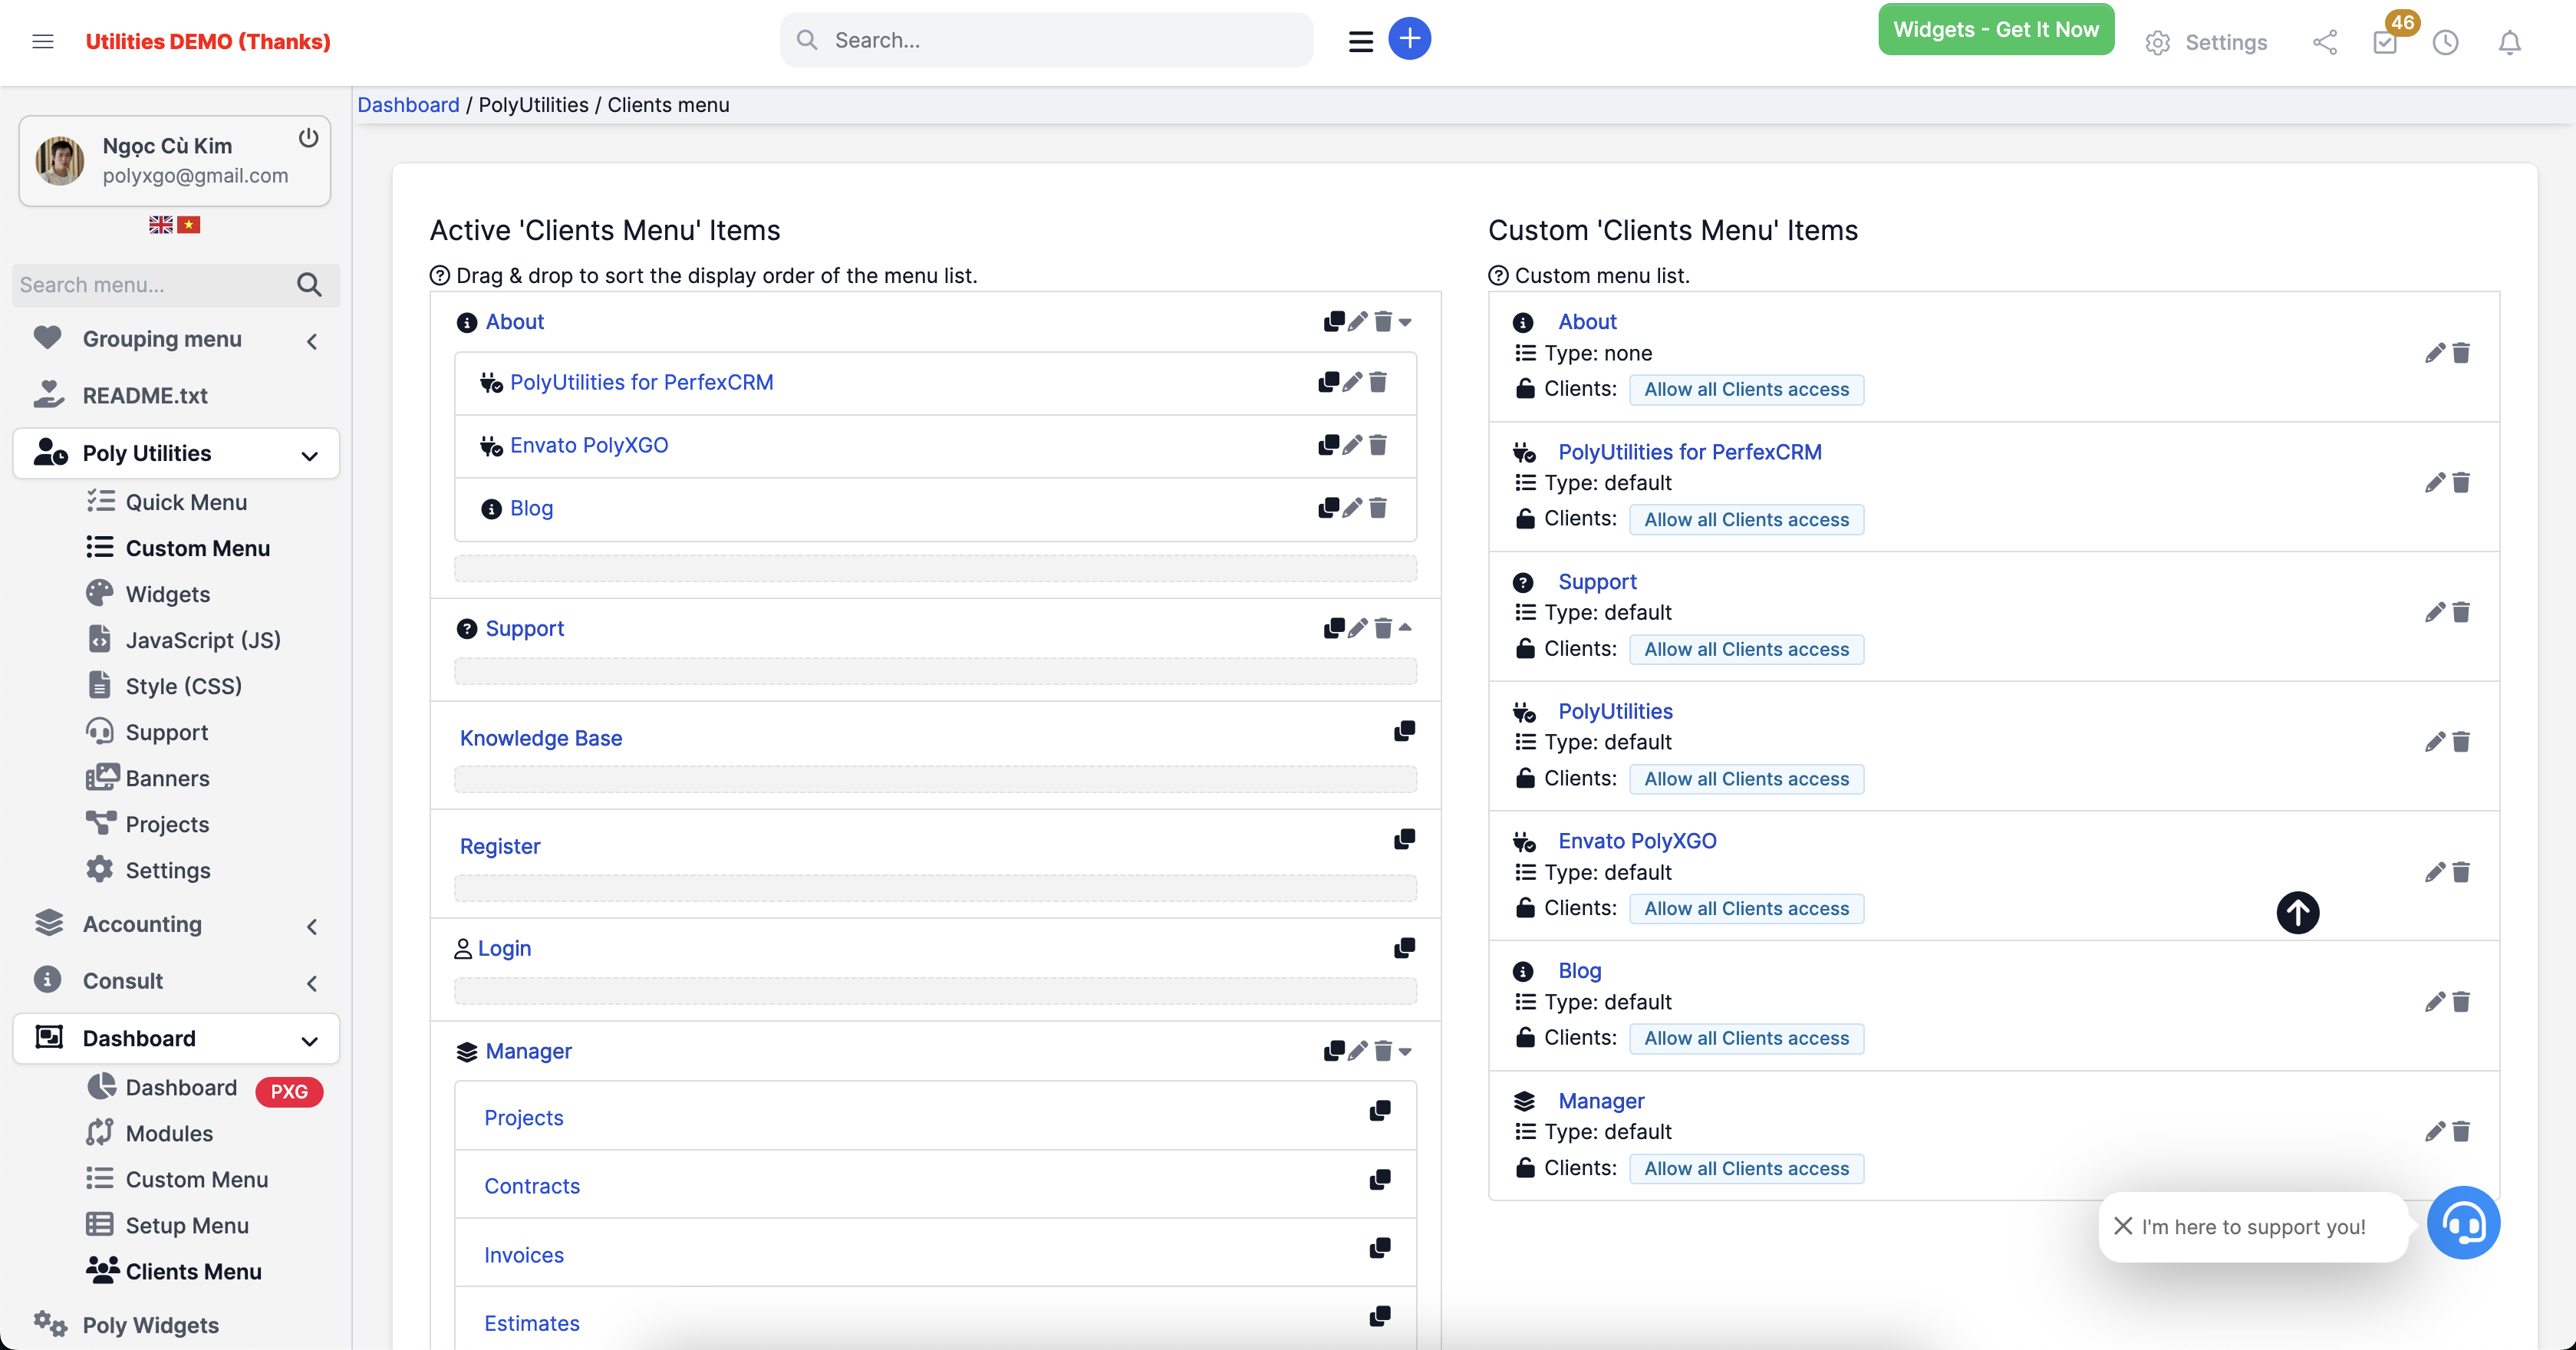
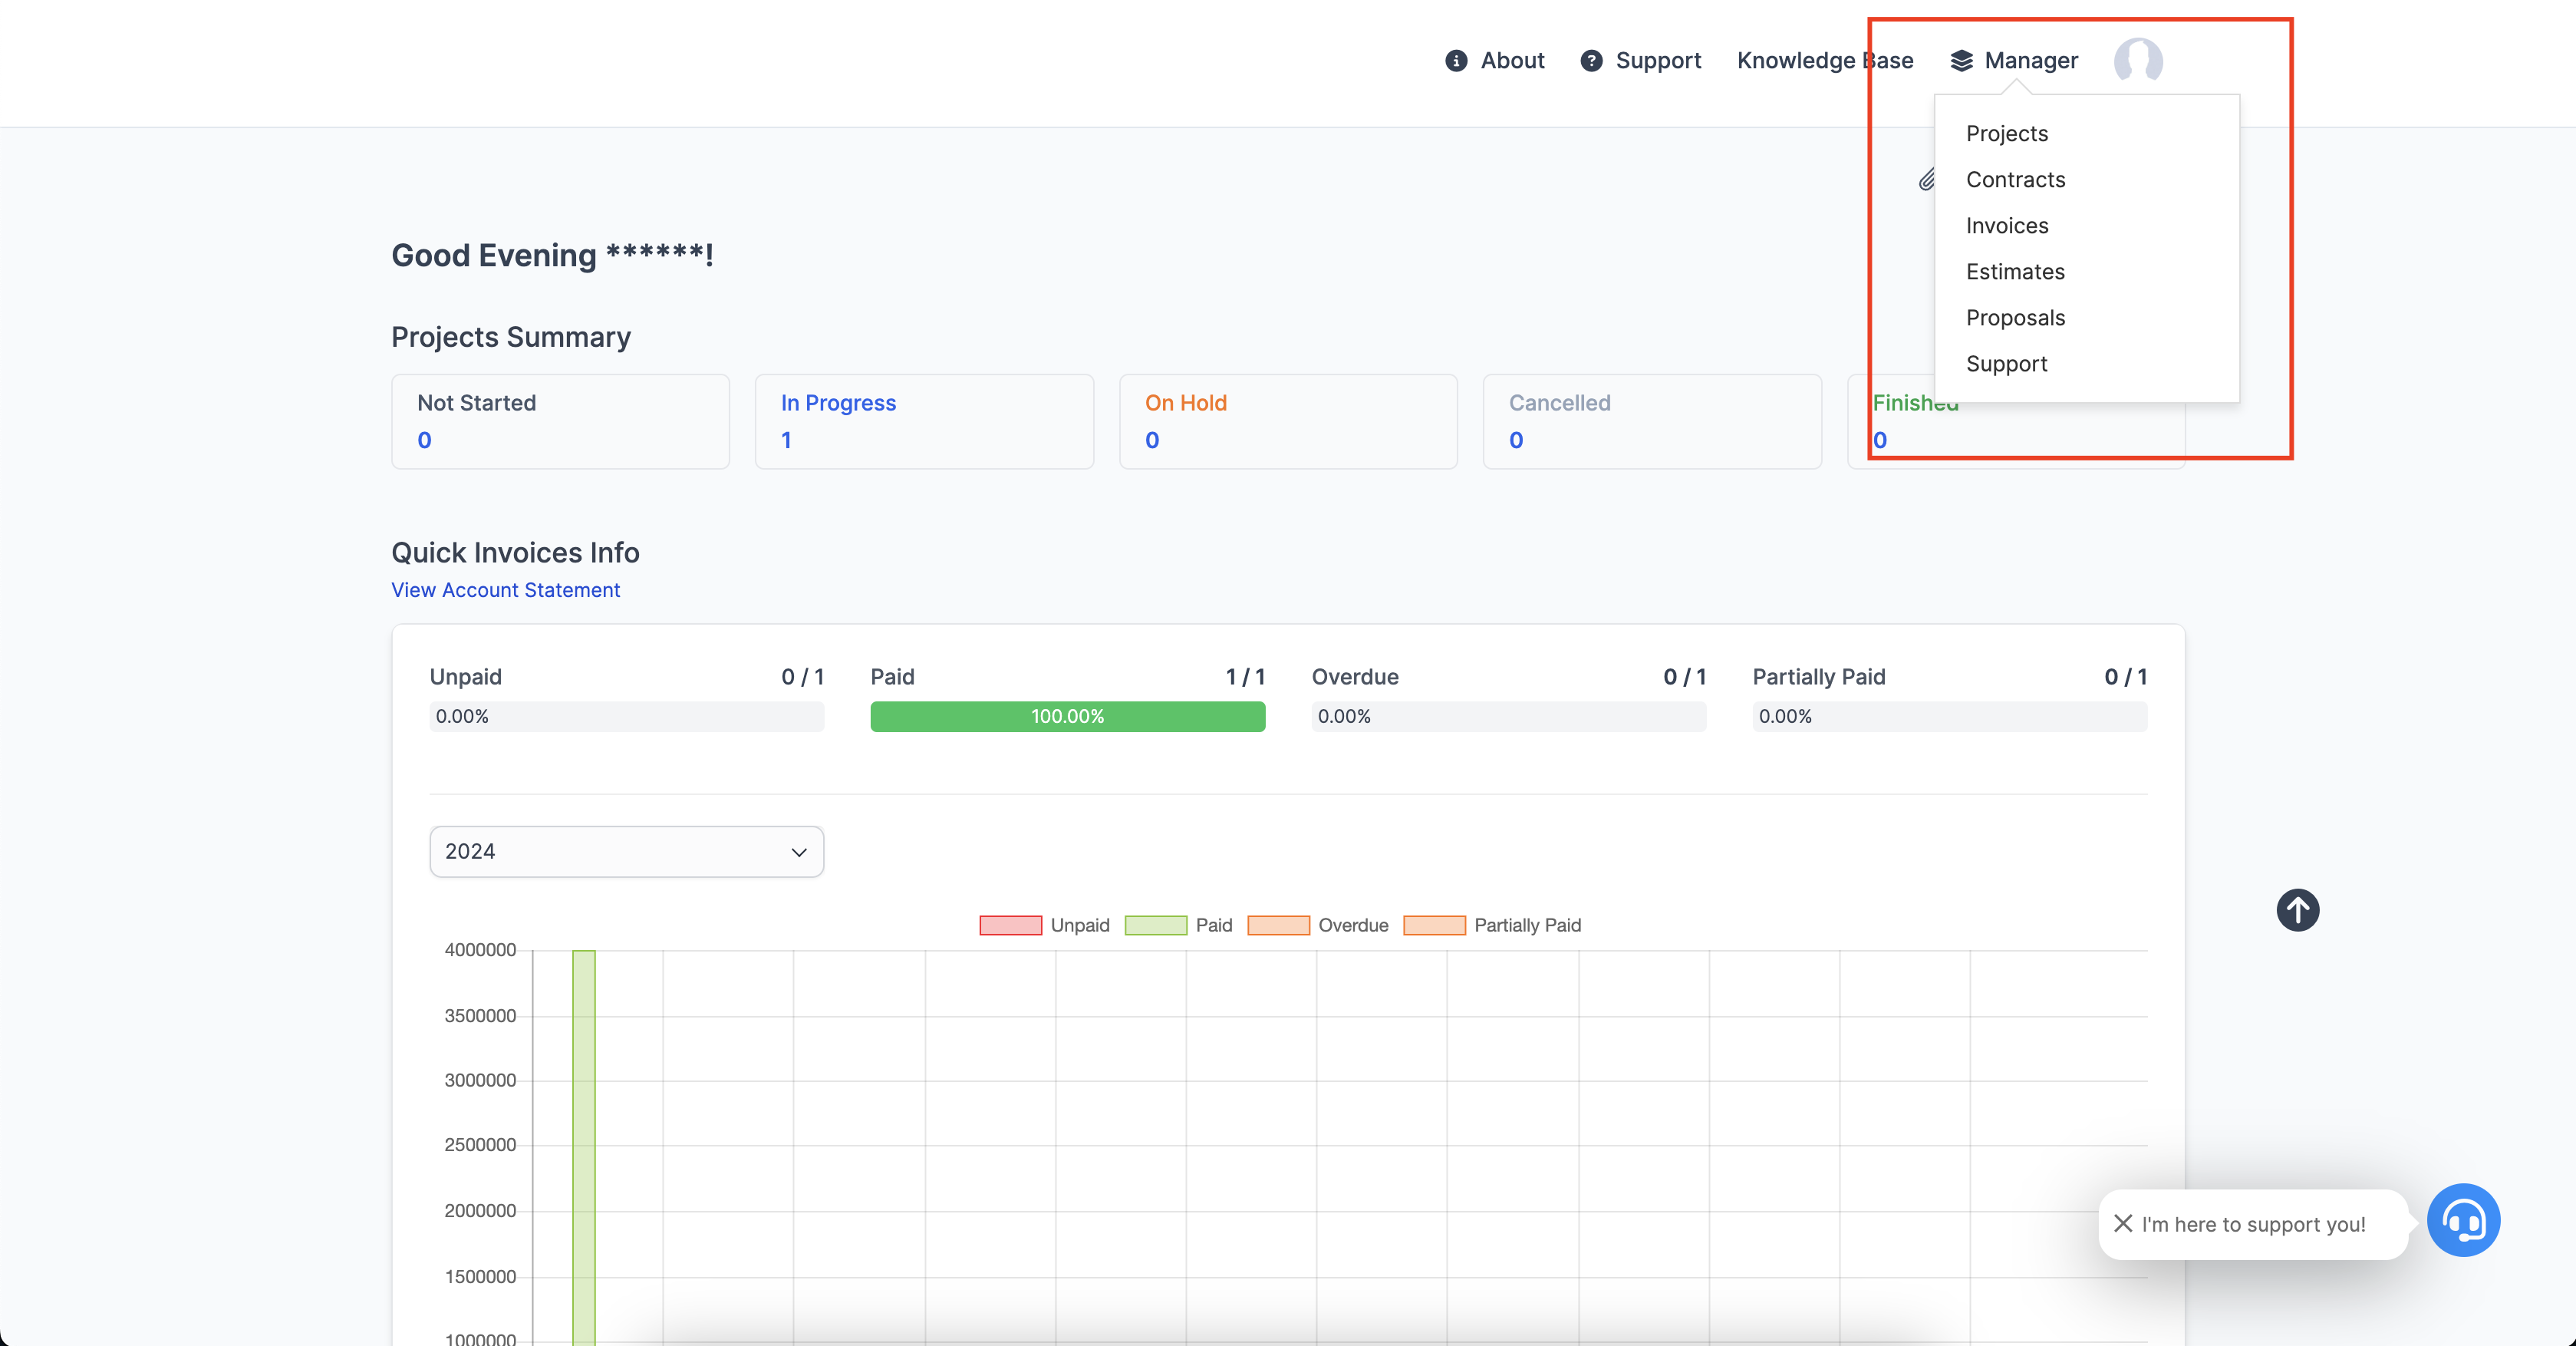
- Supports creating, editing, deleting, and grouping lists of sidebar, setup, and clients menus. Manage display permissions for menus and custom menu groups according to roles & users.
- Easily organize and regroup the list: main menu, settings menu, and user-side menu. Supports adding icons, label content, and background color.
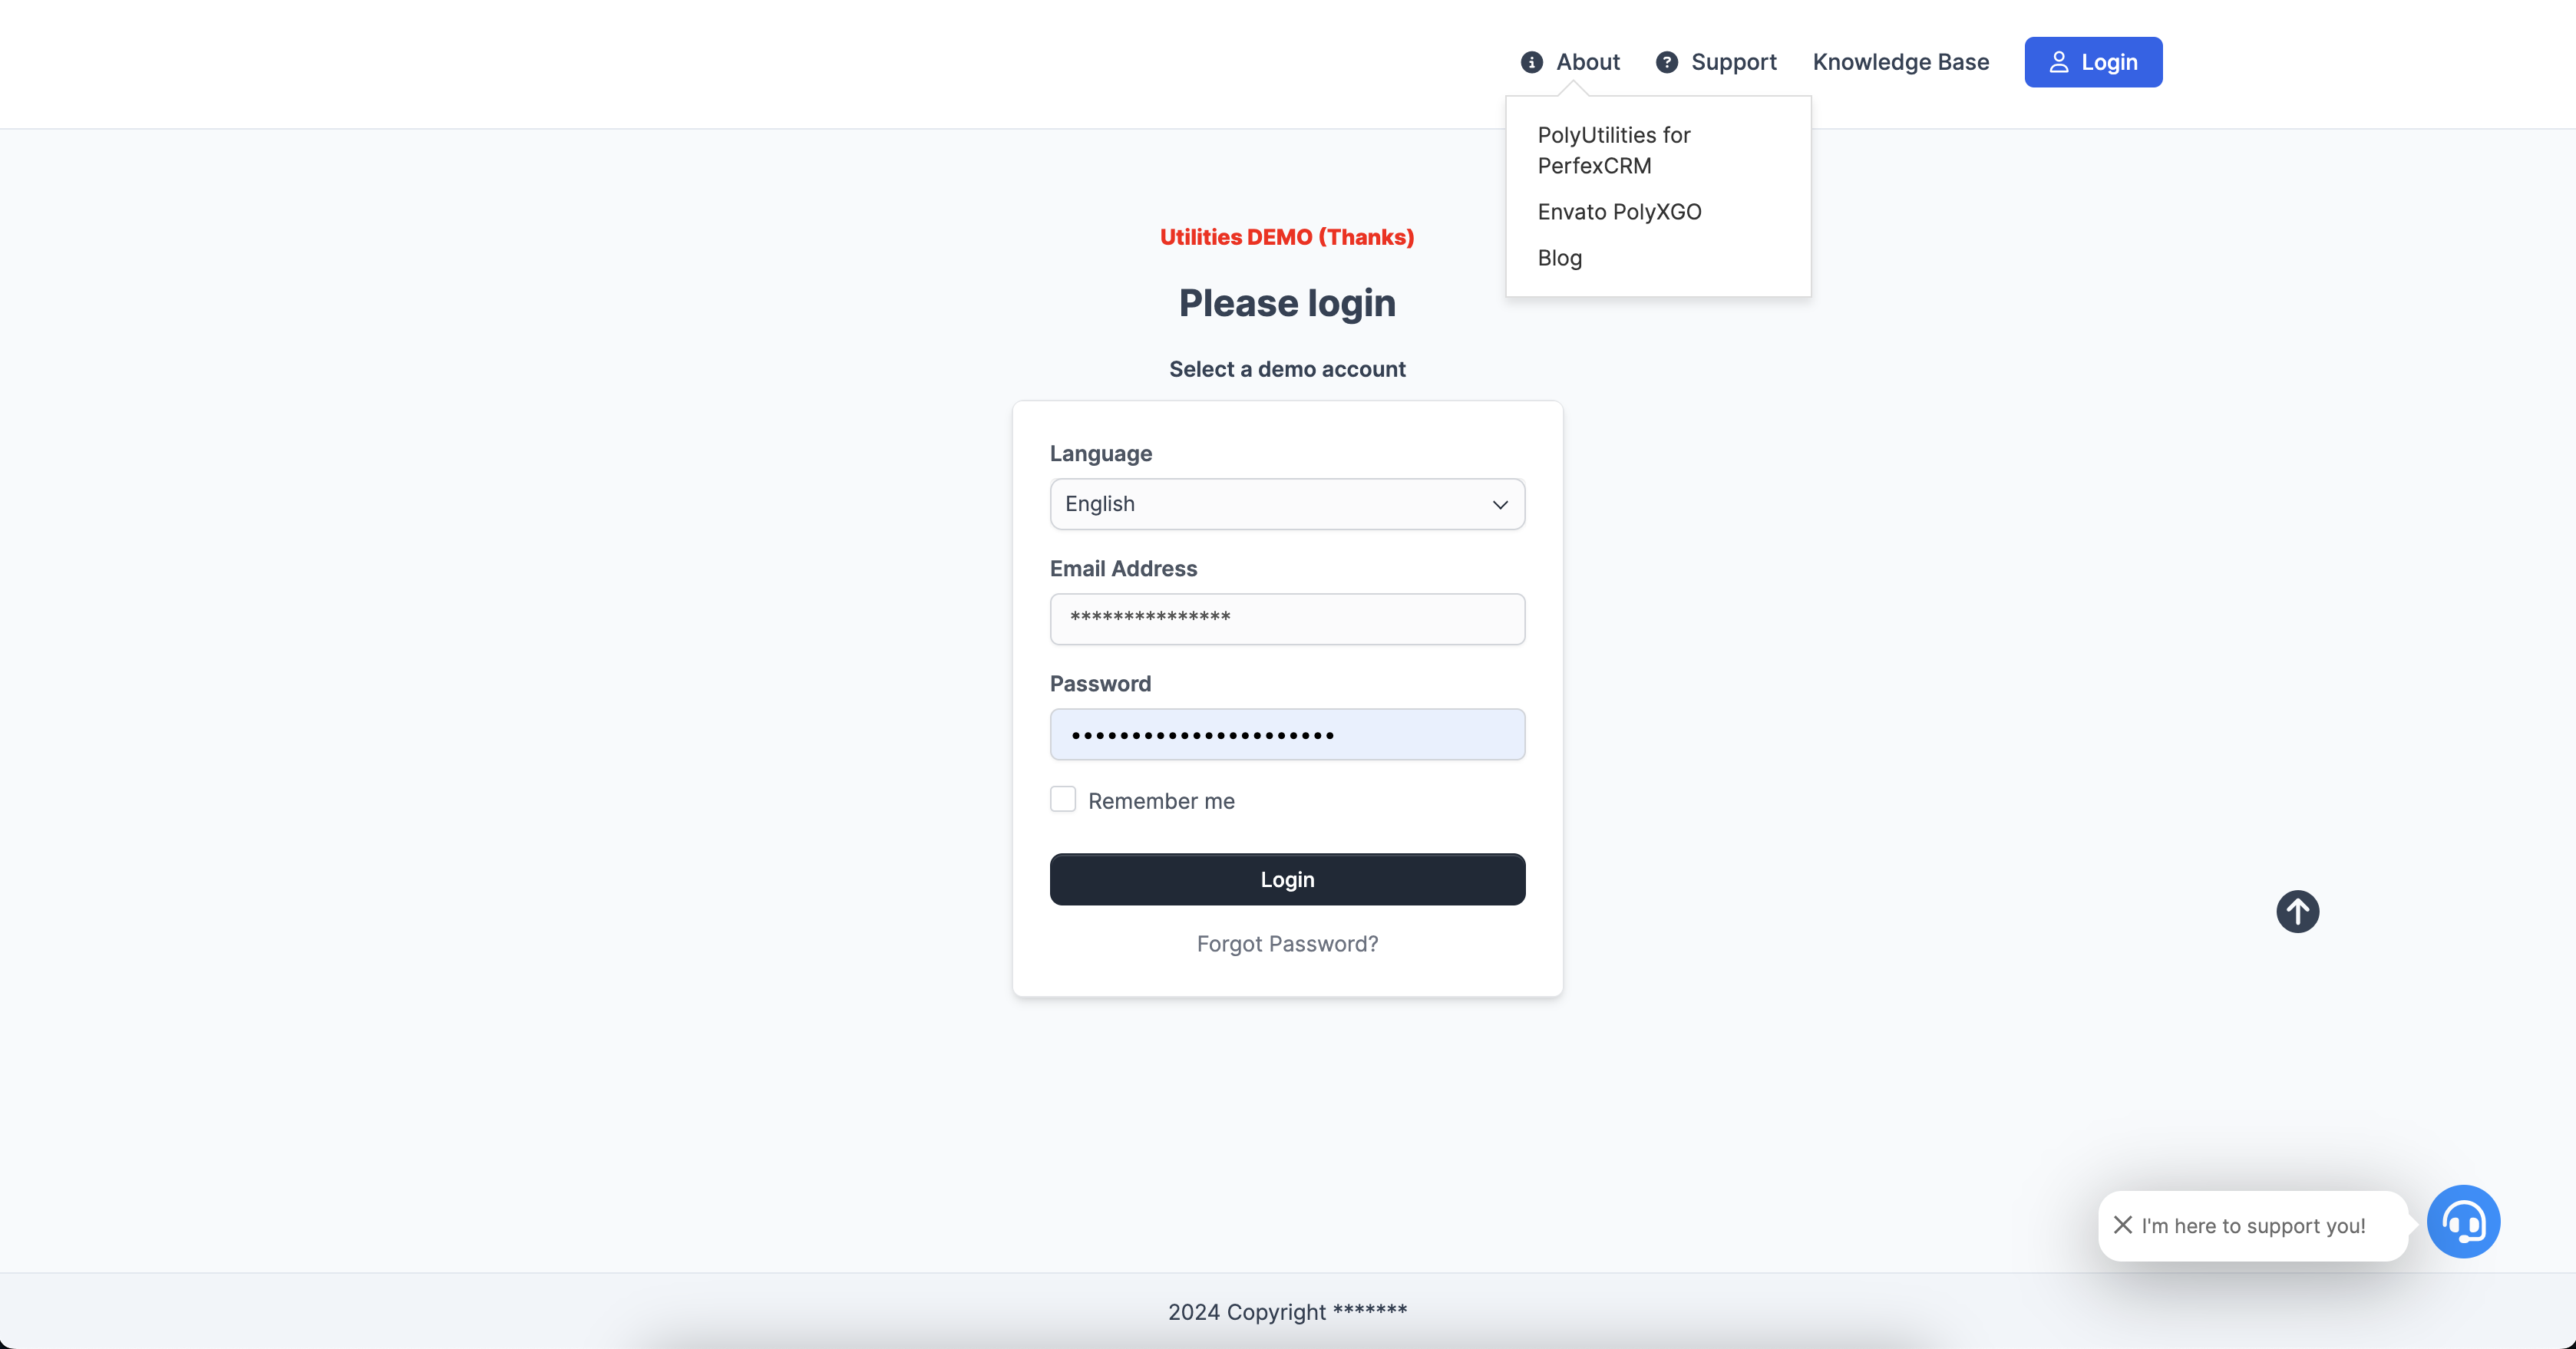
- Custom menu links support iframes, links, convenient for querying general documents, Excel files, contracts, etc., related to a custom menu group. For example, creating a new group of social media links: YouTube, Facebook, TikTok, LinkedIn, Pinterest, etc.
- Supports displaying or hiding menu items in the sidebar & setup section. Combines features to customize different menu groups for various modules within the same system.
- Integrate Type Divider when creating custom menu items. Support creating spacing to divide different menu groups on the sidebar menu and setup.
- Type Popup supports displaying custom HTML content across all 3 levels of the Sidebar menu (Setup menu and Clients to be updated later). Admins can create menus assigned to specific user accounts, clients, or roles with access permissions to view the menu content. Example: a reward announcement board for personnel in the ‘marketing roles’ group (marketing department).
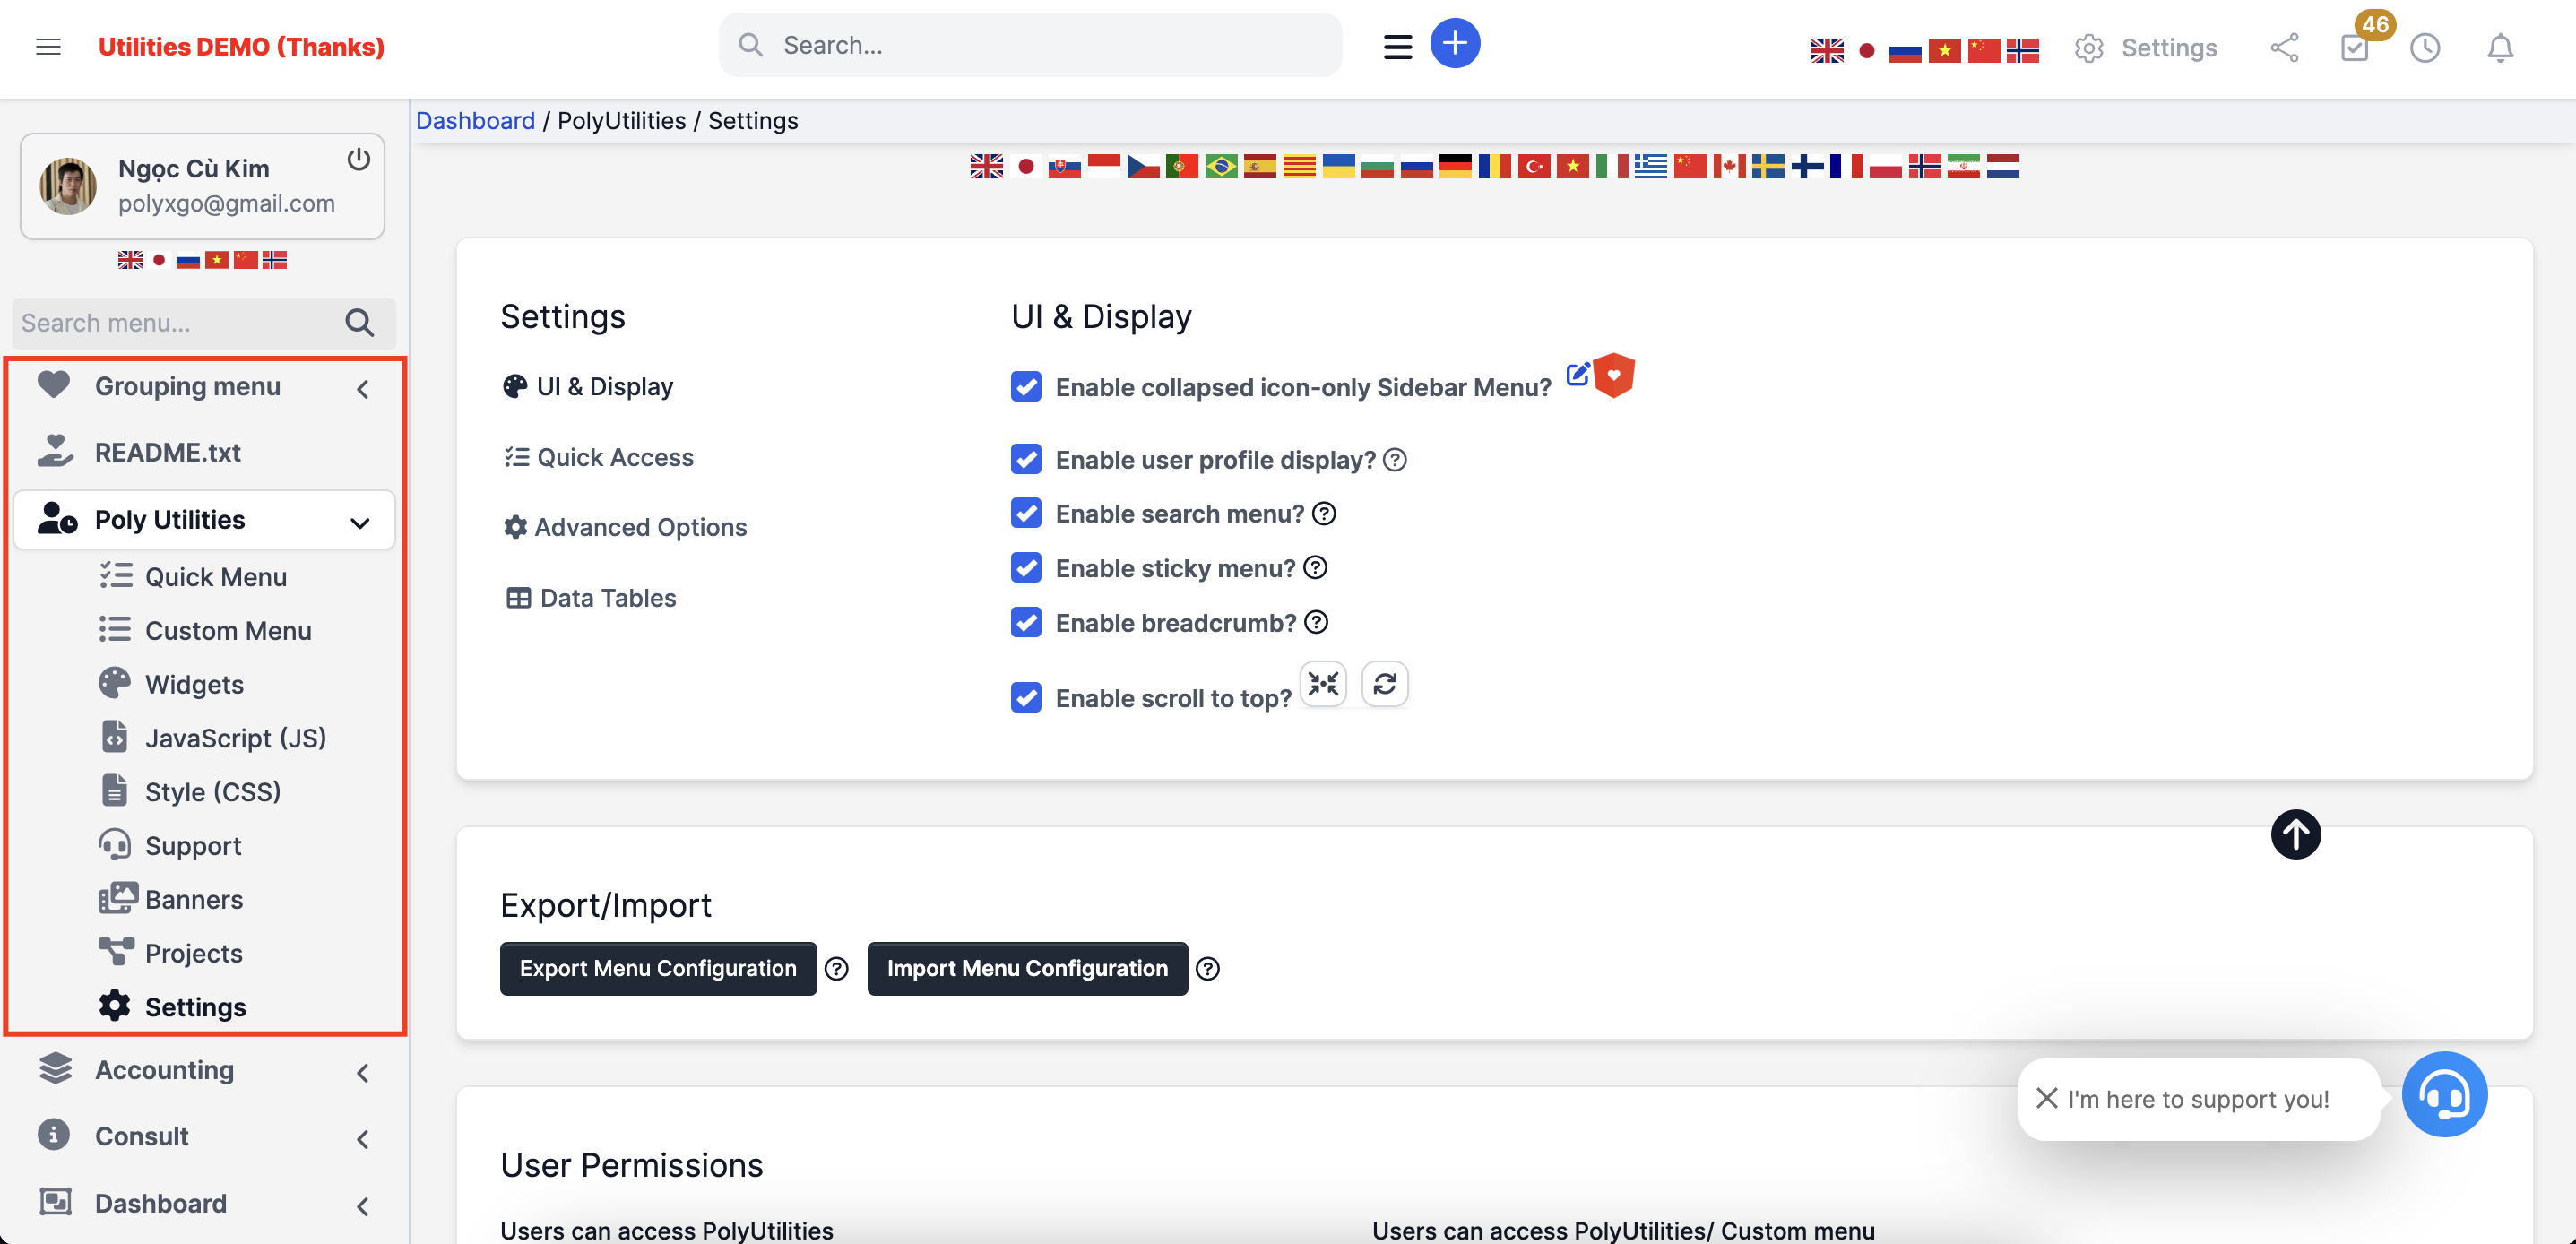
Sidebar menu
Setup menu
Clients menu
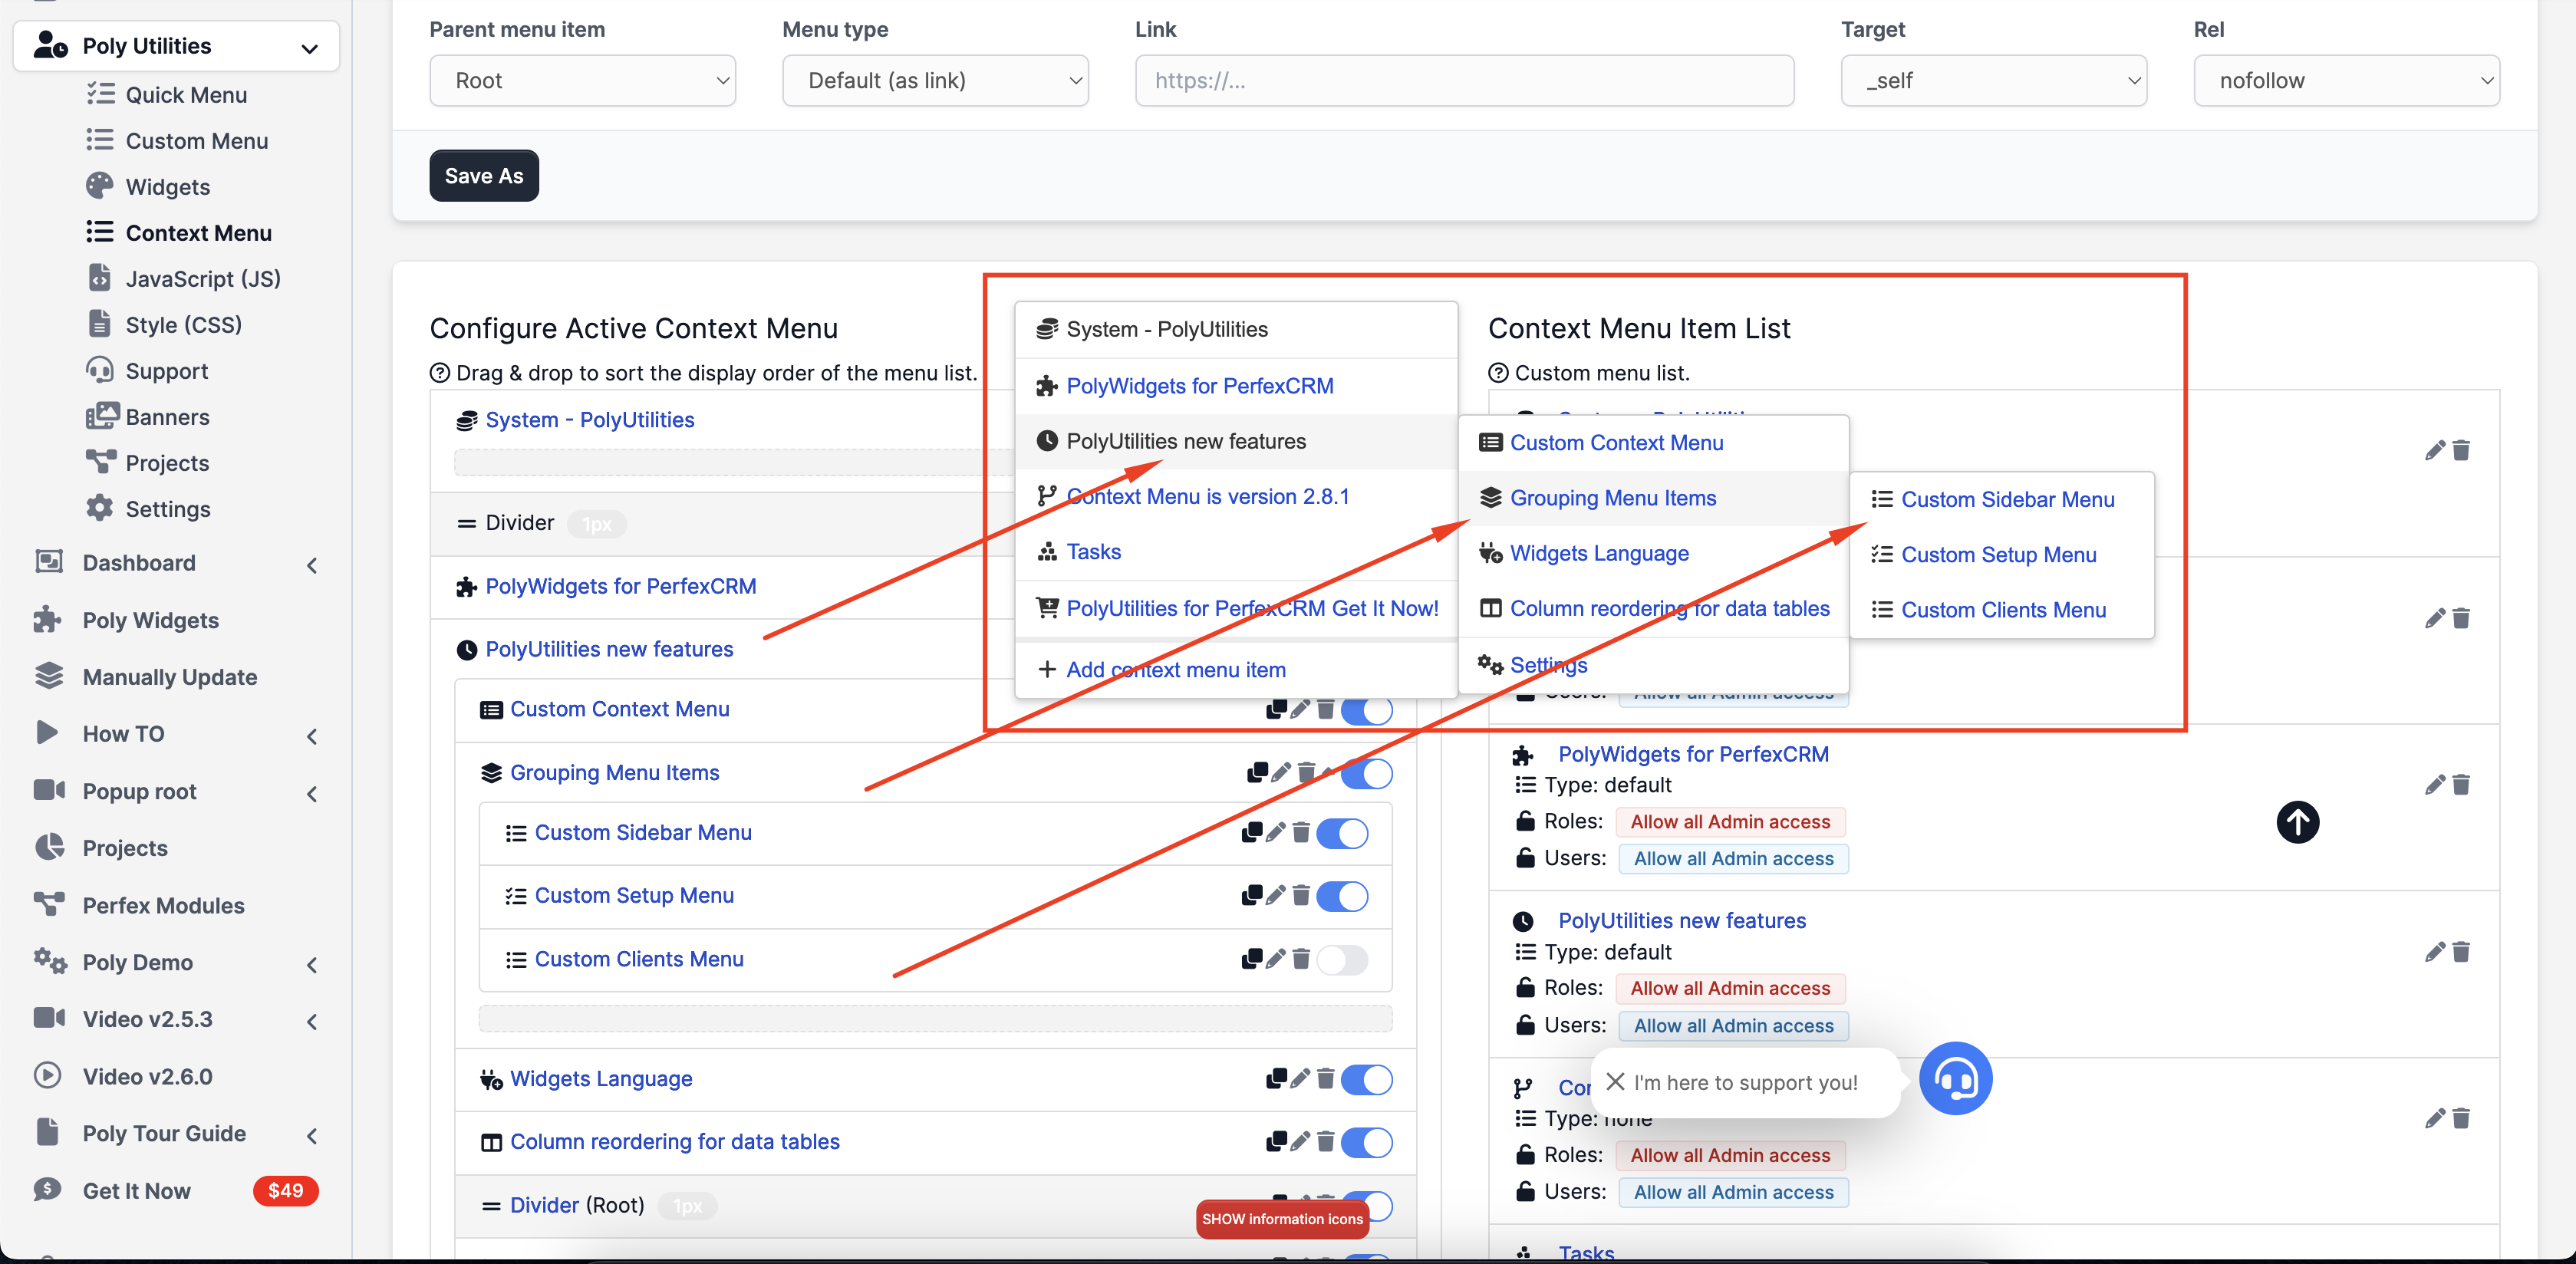
Custom Context Menu
Easily create, group, and manage lists of right-click menu items within the working environment of the Perfex CRM system.
Similar to the Quick Access Menu, the Context Menu allows personnel to quickly navigate to key system components configured through the right-click menu, such as invoices, customers, projects, and more.
Widgets
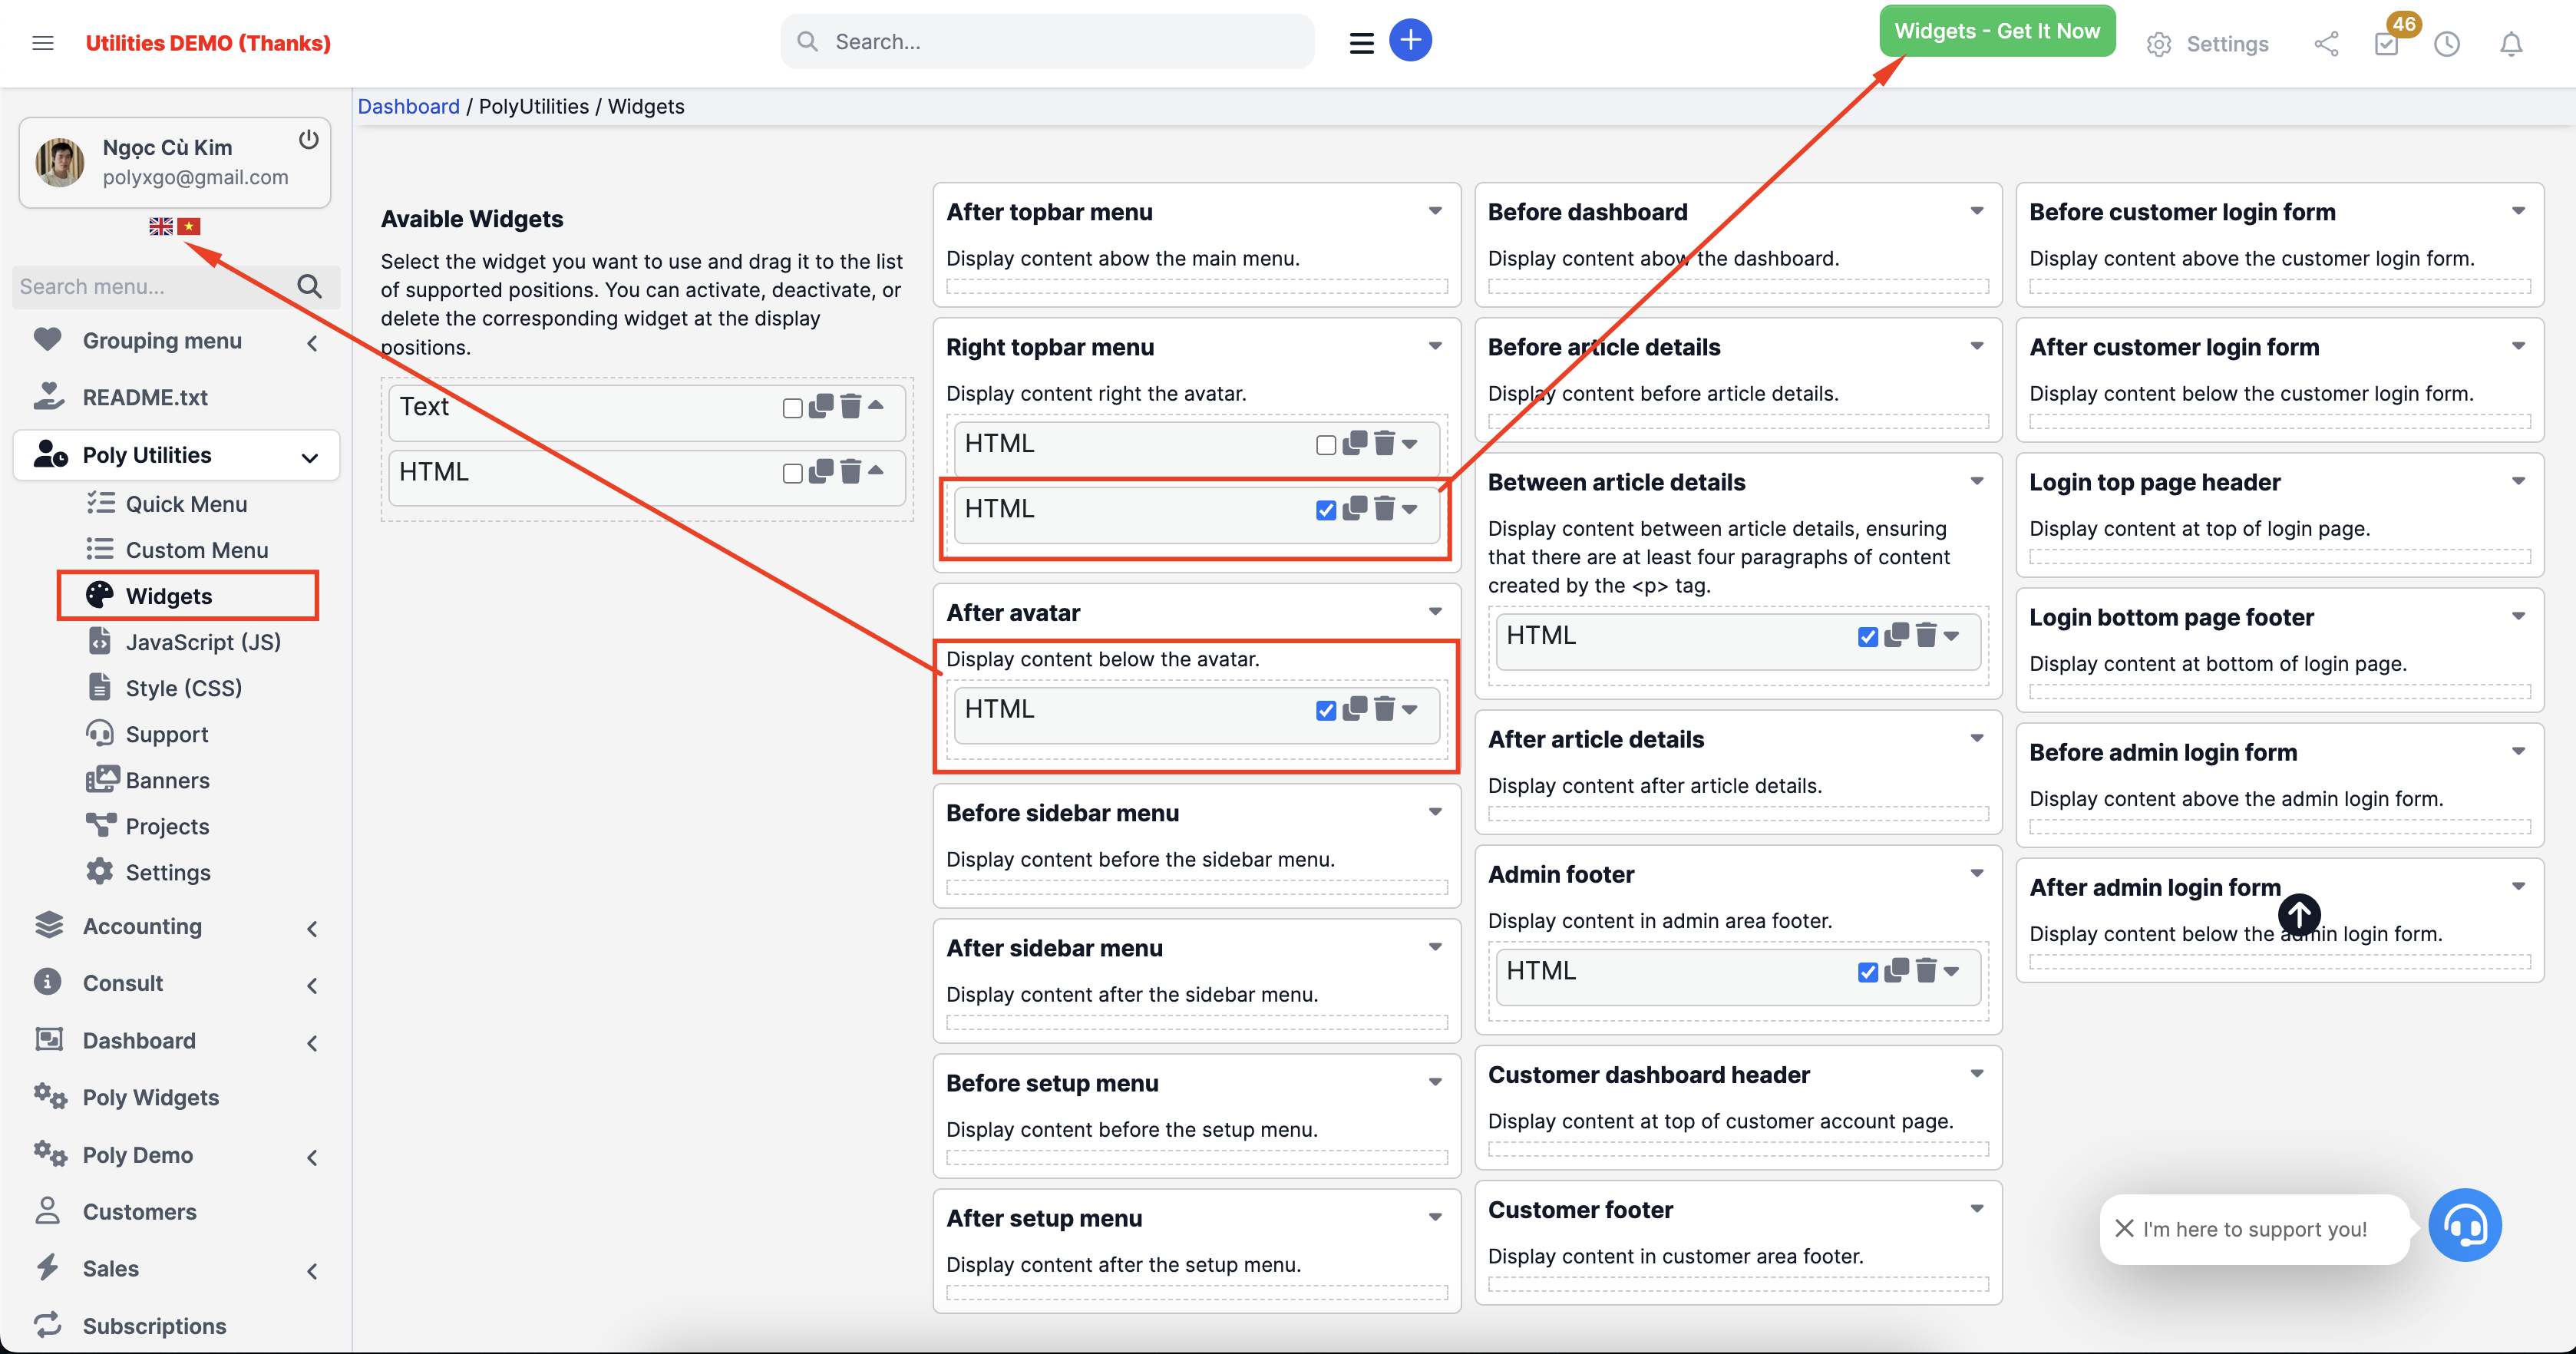
Supported widgets
Currently, the modules support default widgets such as:
- Text: to display text content.
- Image: to display images. In comming soon.
- HTML: to display custom HTML content.
A list of popular and essential widgets will be gradually integrated in upcoming versions.
Supported widget display areas
- After topbar menu: Display content abow the main menu.
- Right avatar: Display content right the avatar.
- After avatar: Display content below the avatar.
- Before sidebar logo: Display before sidebar logo position.
- Before sidebar menu: Display content before the sidebar menu.
- After sidebar menu: Display content after the sidebar menu.
- Before setup menu: Display content before the setup menu.
- After setup menu: Display content after the setup menu.
- Before dashboard: Display content abow the dashboard.
- Before article details: Display content before article details.
- Between article details: Display content between article details, ensuring that there are at least four paragraphs of content created by the <p> tag.
- After article details: Display content after article details.
- Admin footer: Display content in admin area footer.
- Customer dashboard header: Display content at top of customer account page.
- Customer footer: Display content in customer area footer.
- Before customer login form: Display content above the customer login form.
- After customer login form: Display content below the customer login form.
- Before admin login form: Display content above the admin login form.
- After admin login form: Display content below the admin login form.
Hooks add additional display positions for Widgets
The function below will add one widget display position and a list of default positions. When developing custom modules, if you need to set up a specific hook to display widget data, you can use this feature.
hooks()->add_action('poly_utilities_widgets_init', [$this, 'poly_utilities_hook_widgets_init']);public function poly_utilities_hook_widgets_init($widgets){
$new_widget = array(
'id' => 'poly-widget-simple-hook',
'name' => 'Simple hook main menu',
'description' => 'Display hook.'
);
$widgets[] = $new_widget;
return $widgets;
}Display content.
if (poly_utilities_widget_helper::is_active_widget('poly-widget-simple-hook')) {
     poly_utilities_widget_helper::dynamic_widget('poly-widget-simple-hook');
}
All-in-One Support for Clients
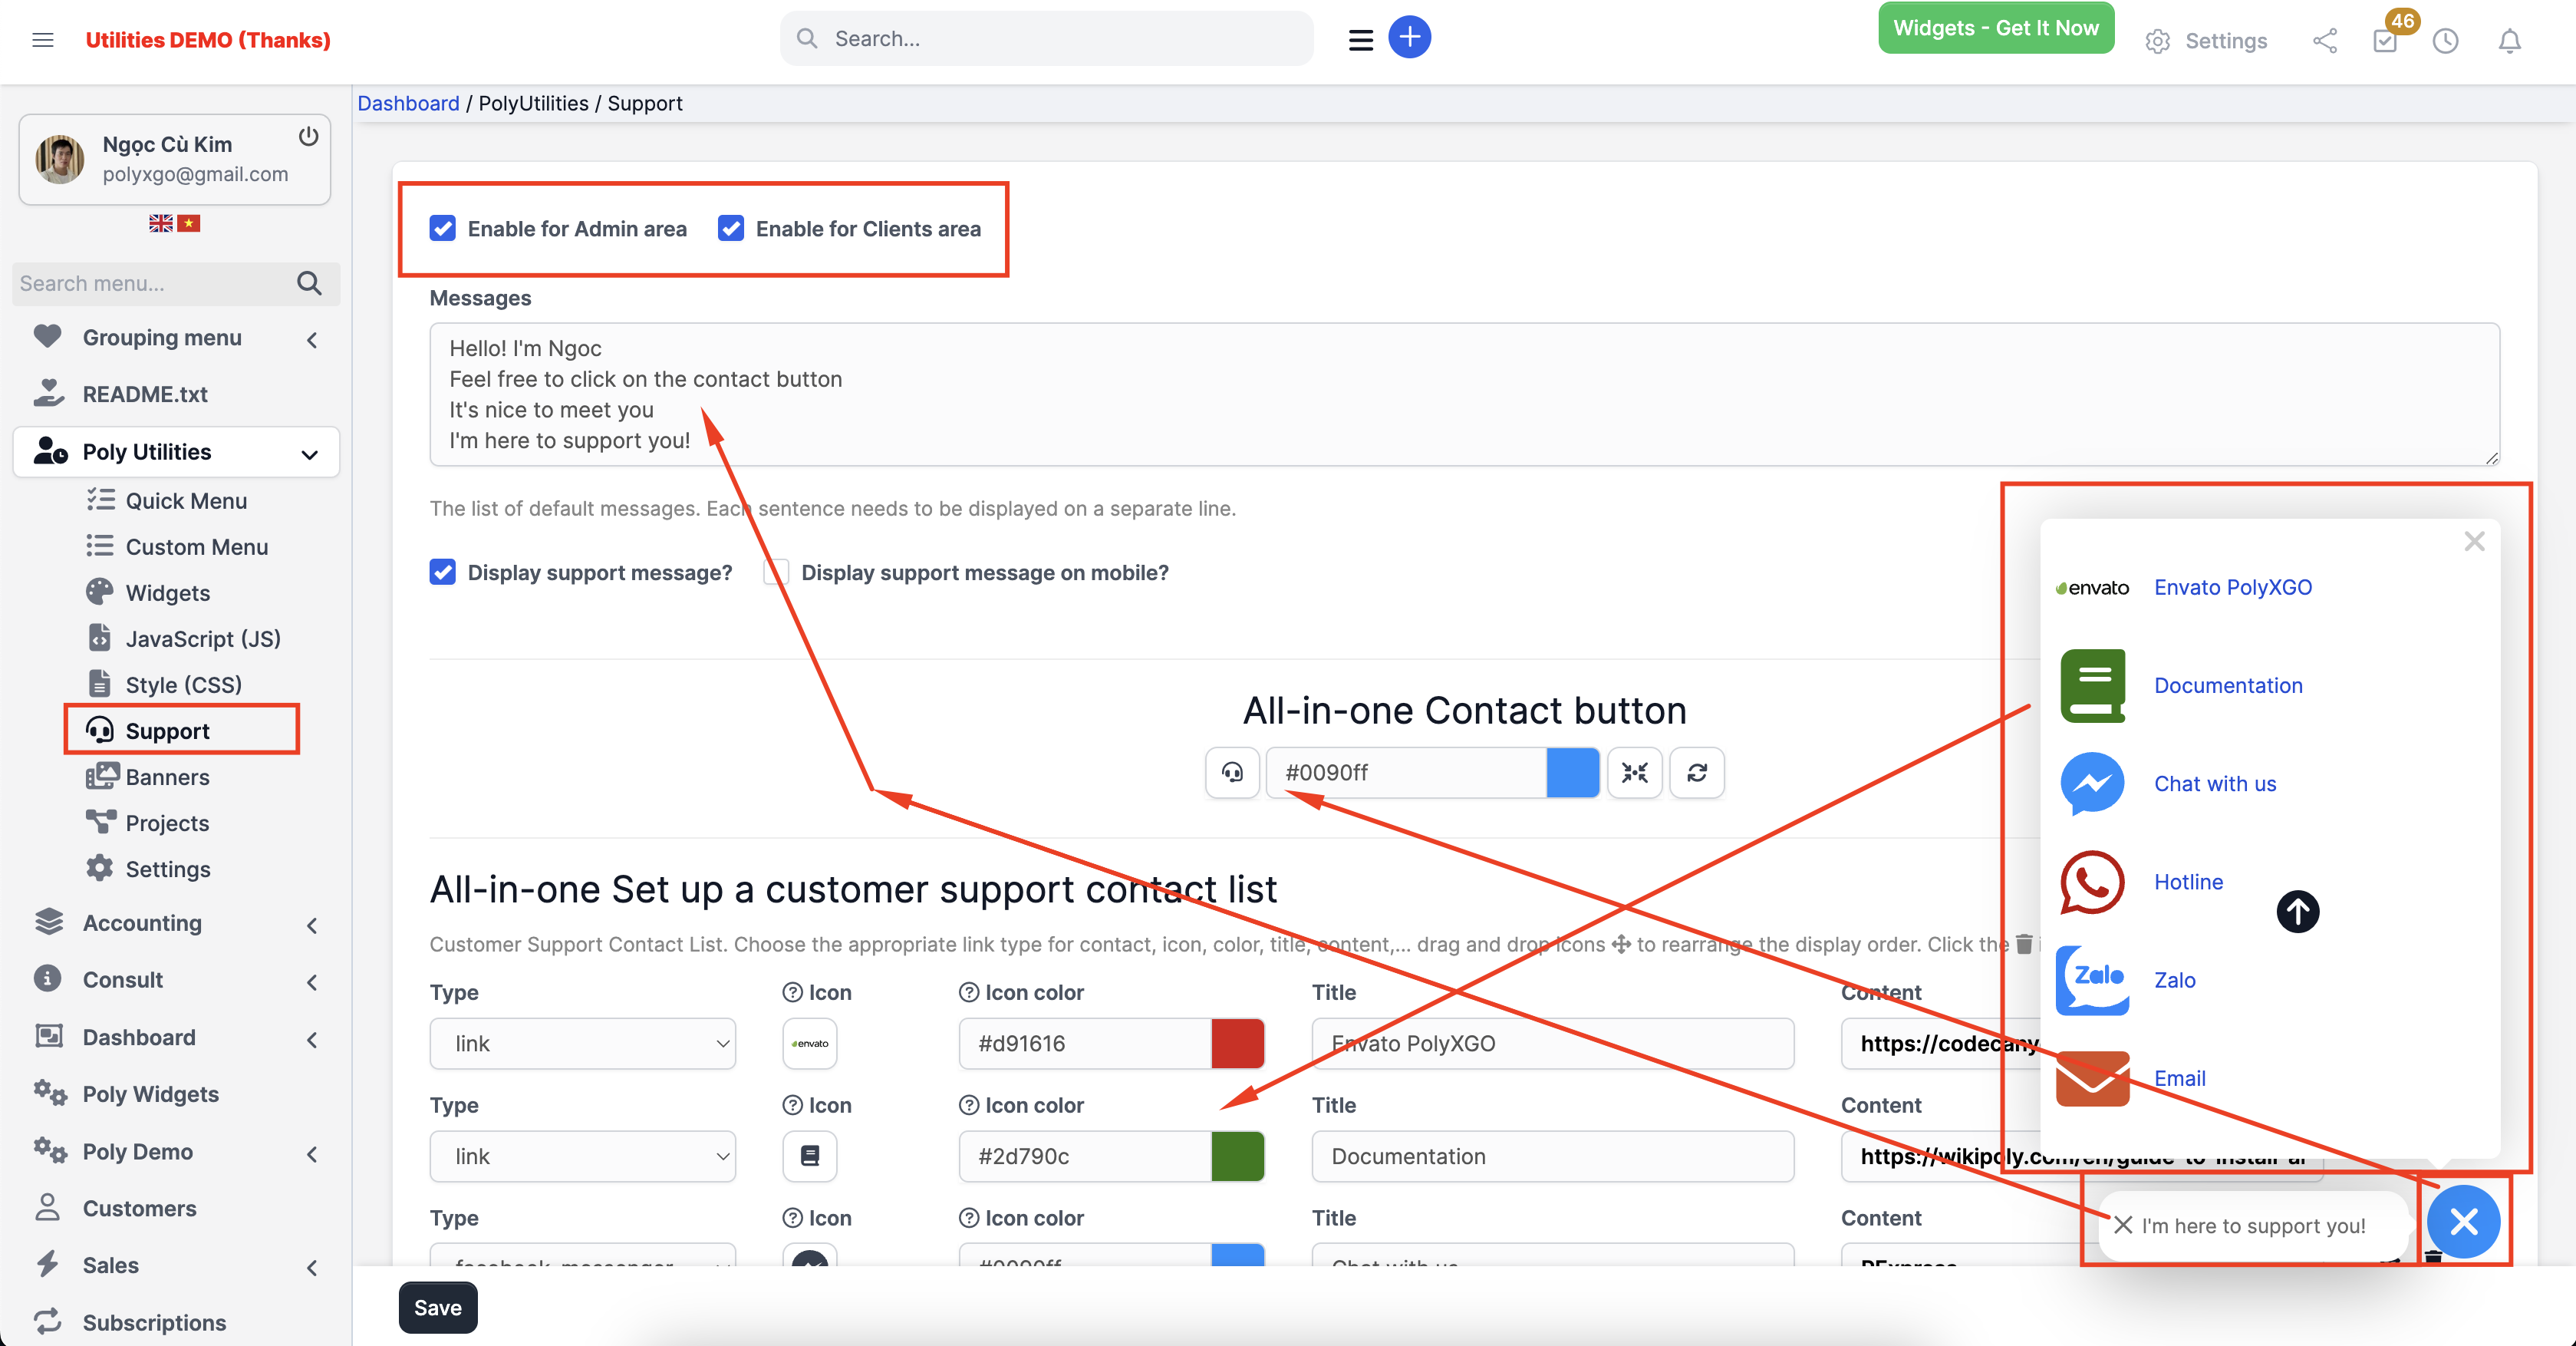
The All-in-one Support feature helps you connect with customers through popular communication channels such as phone, email, chat messenger, WhatsApp, Viber, linking to documents, and support centers. Support customization of interaction messages with customers for the support button.
- It’s possible to display custom AIO for Admin, Clients, or both.
- Personalized Support: When logged in, customers can access contact information for personnel in charge of specific projects currently underway. The feature will be integrated in the upcoming version.
- Support for drag-and-drop to adjust the display position of the All-in-One Contact button icon. This occurs on sites using additional modules with fixed icons on the page, such as chat plugins like WhatsApp.
Banners/ Announcements sliders
Create and manage a list of banner sliders.
- Banner items support uploading banners, banner links, video iframes, article iframes, HTML content, etc.
- Display banner slides in supported widget areas: admin, clients, widget positions in post content, etc.
- Set display and end schedules for each banner.
- Choose popular slider effects for banners: fadeInOut, slide, flip, flipX, flipY, zoomInOut, jackInTheBox, rotateInOut.
Search menu for Perfex CRM
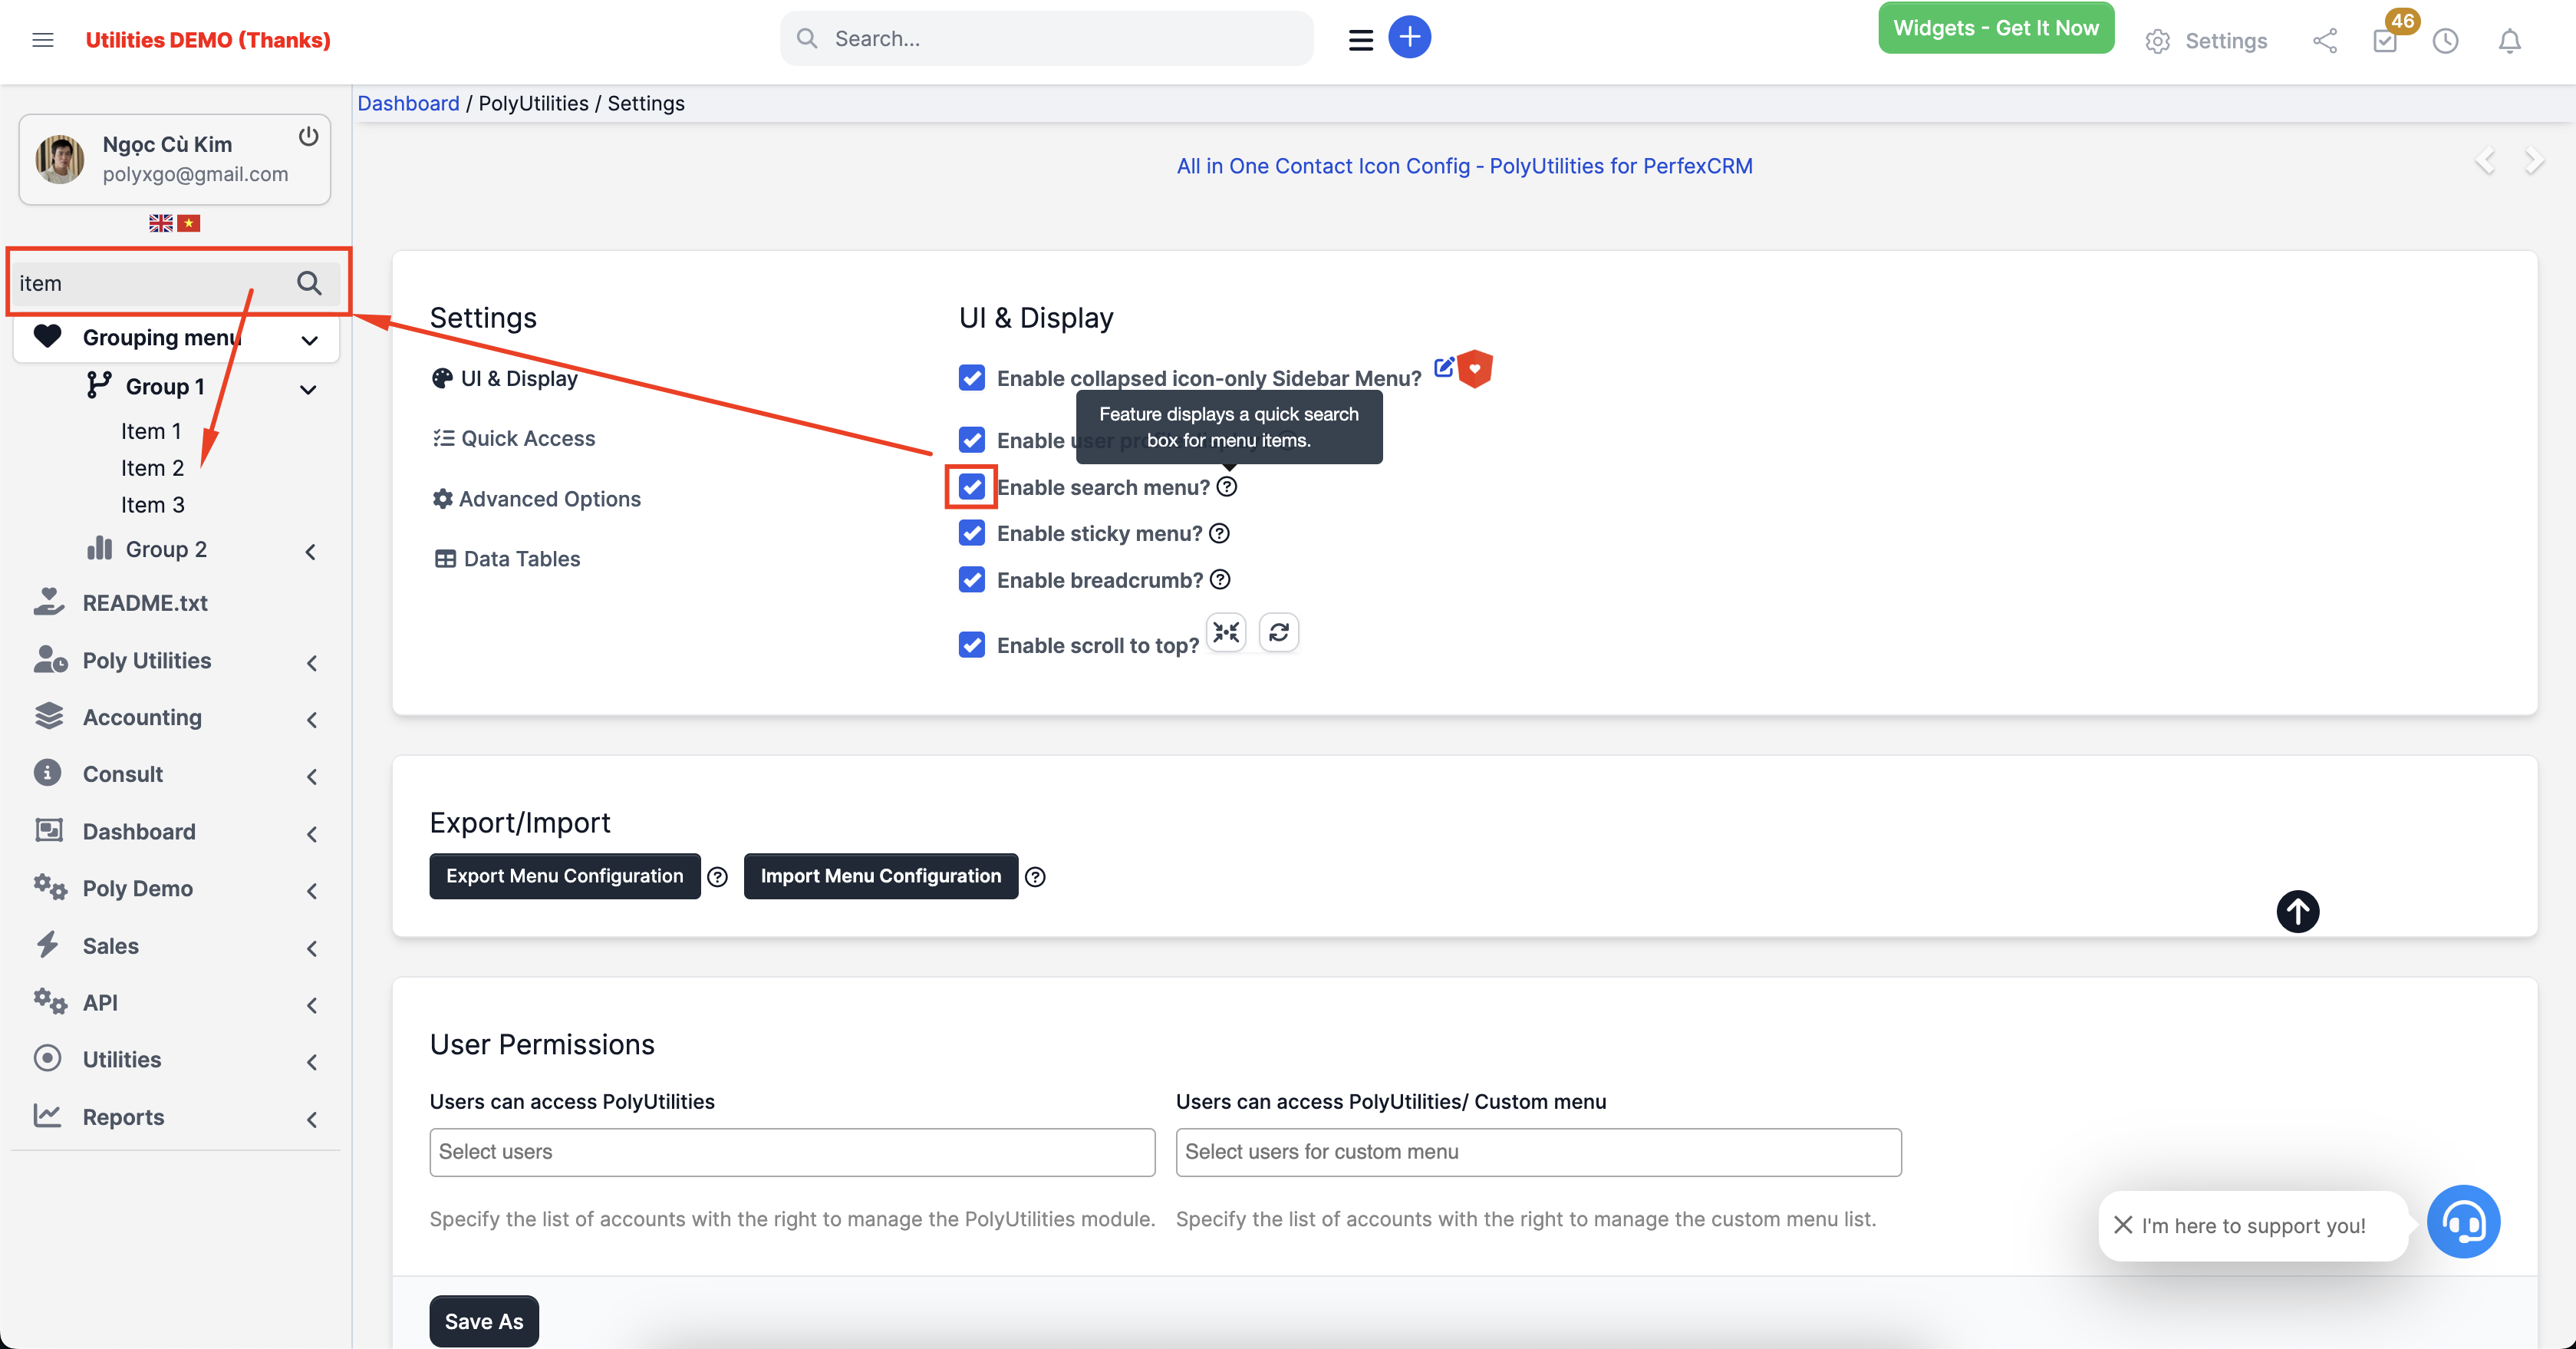
Accessing menus while working within a system installed with numerous modules can be quite time-consuming. Alongside the Quick Access Menu, the menu search feature will assist you in quickly finding the desired feature menu. After searching for a menu, you can also add the search results to the Quick Access Menu for swift use in subsequent work sessions.
Integration of Filtering Feature on Data Display Table
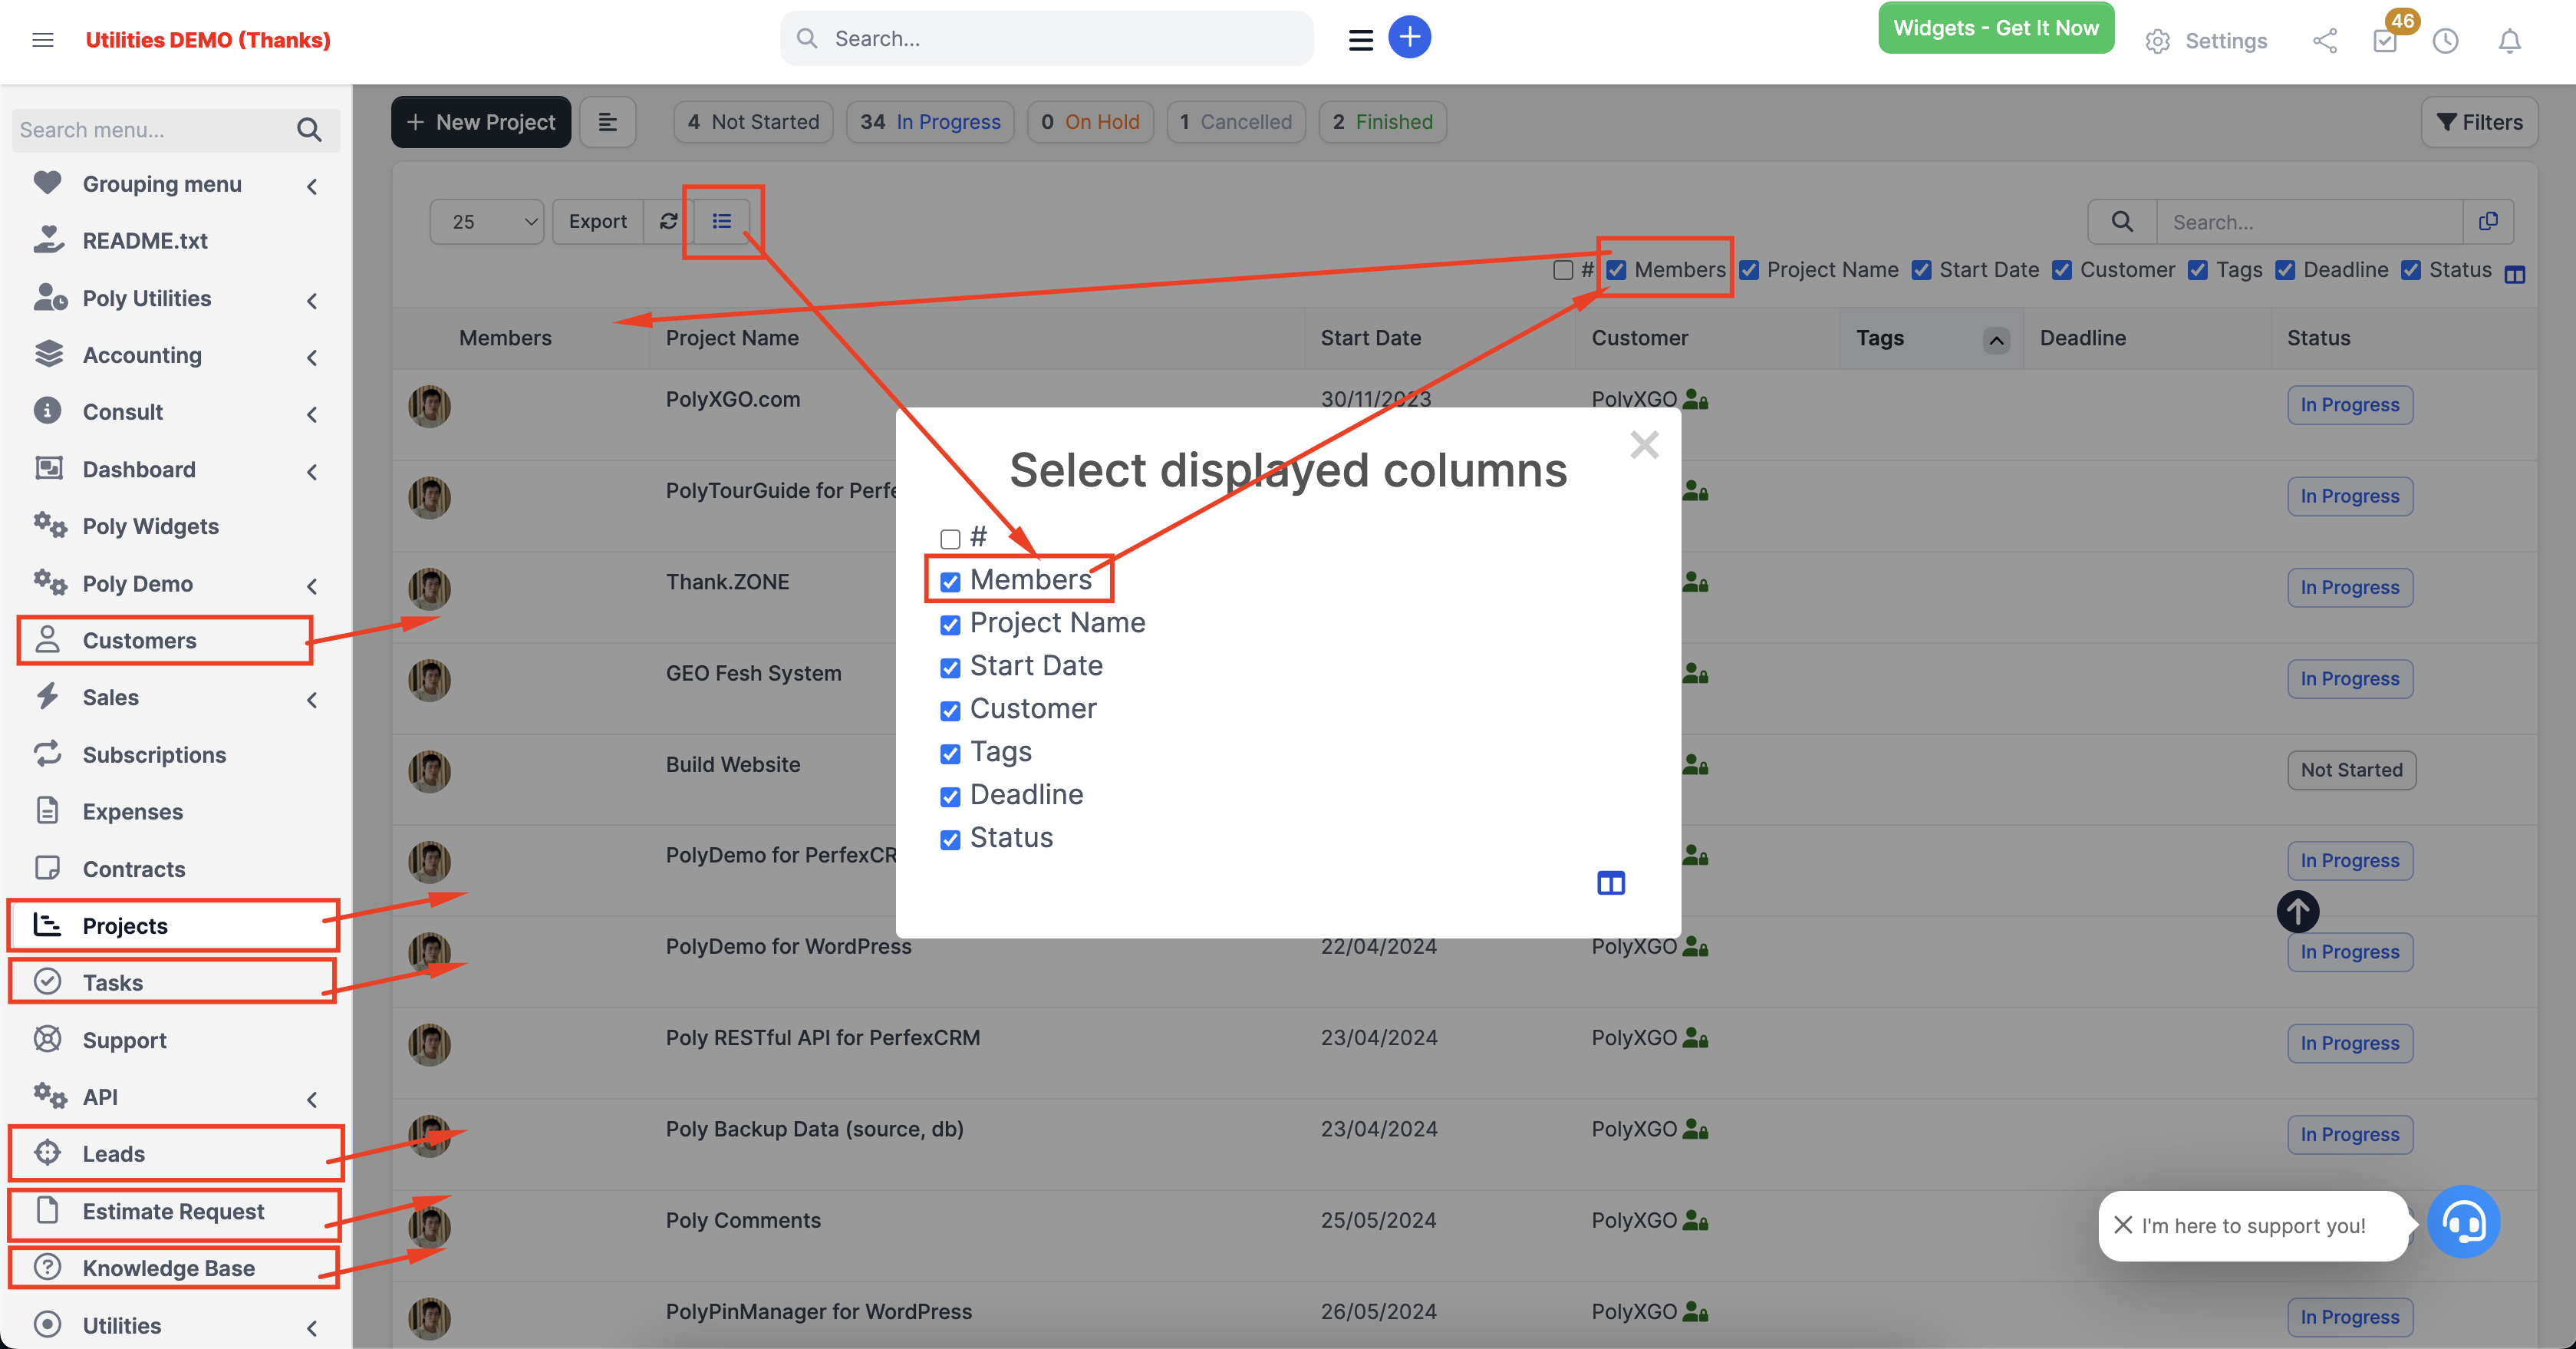
Supports optional filtering columns on all data tables within PerfexCRM & other associated modules: Customers, Contracts, Invoices, Projects, etc. The feature includes storing configurations per administrative account and supports multi-language functionality.
Quick Access Menu
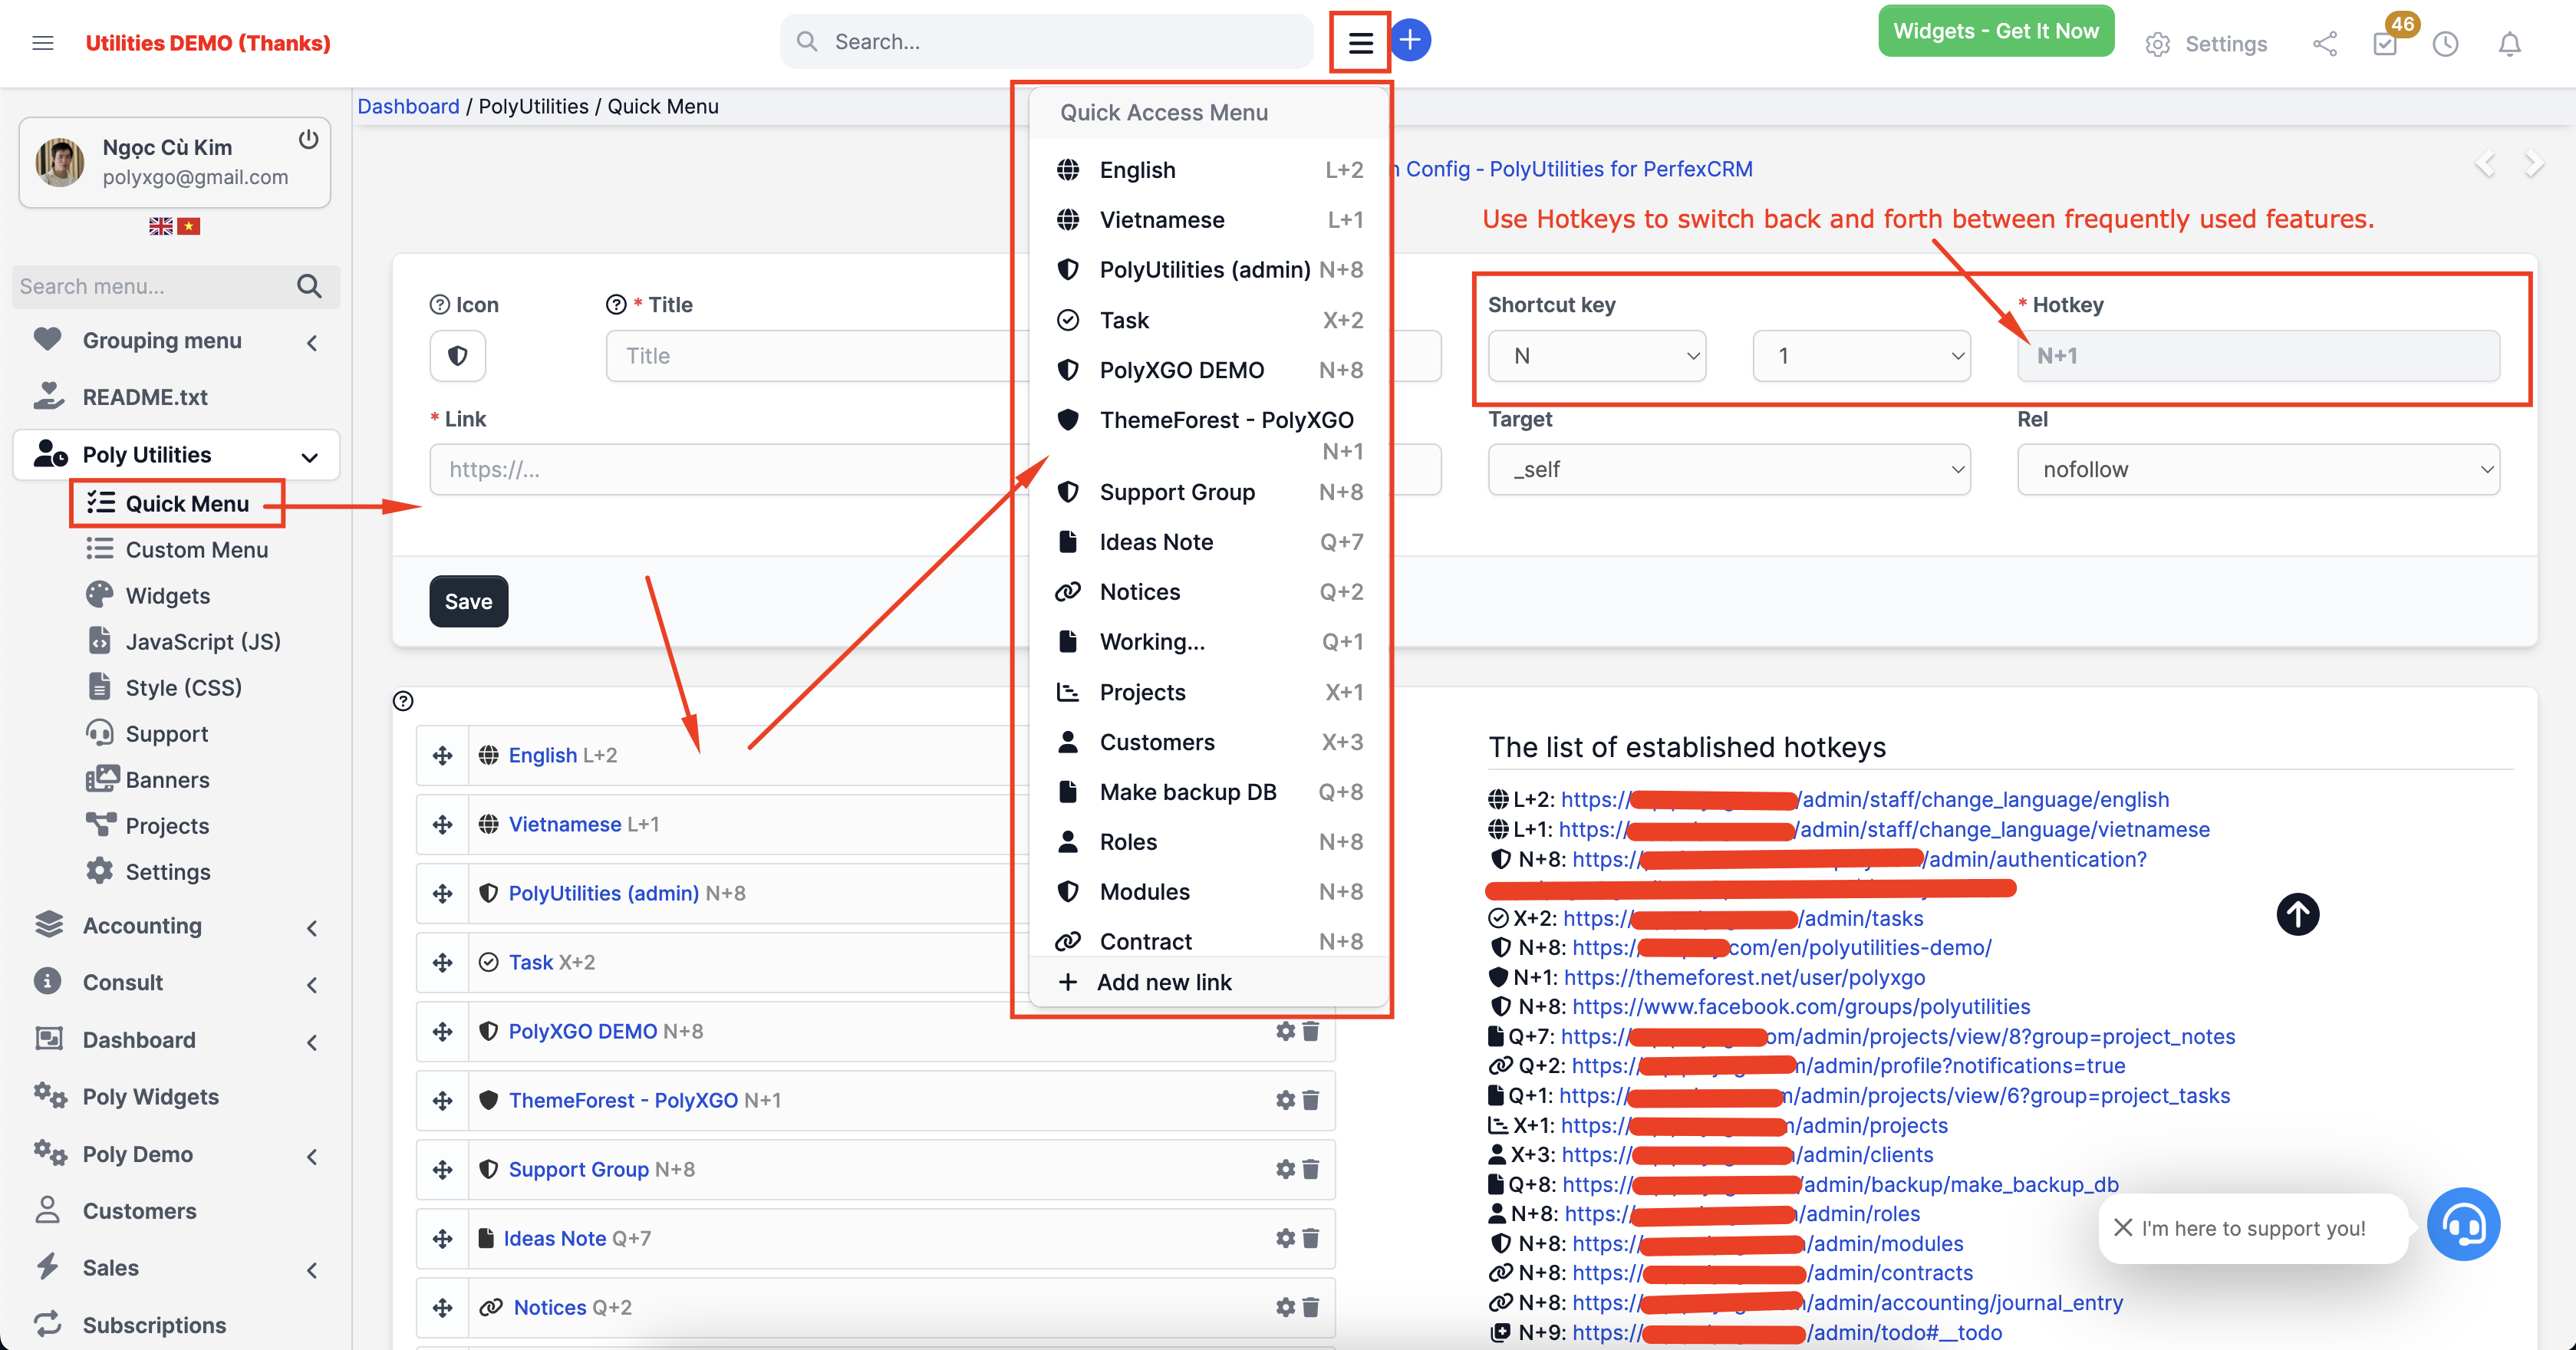
Time is valuable in work. Quickly accessing frequently managed components contributes to increased work efficiency.
Create a New Quick Access Link
Go to PolyUtilities > Quick Menu. Enter the following details:
- Icon: CSS icon class supported by Font Awesome or custom icon classes. For example: fa fa-file
- Title: Display title anchor text on the quick access menu.
- Shortcut key (Hotkey): Choose a shortcut key for quick access to the link, format as one alphabet character and one numeric character.
- Link: Access link to navigate to. After entering all the necessary information, press Save to create the new quick access link.
- Target: _blank, _self, _parent,…
- Rel: follow, nofollow, noopener,…
Sort Order
- To arrange the display order of the quick access links, go to PolyUtilities > Quick Menu. In the section displaying the list of quick access links, click and drag the links to change their positions.
- Then, save to update the display order on the Quick Access Menu.
Edit or Delete Quick Access Links
- Go to PolyUtilities > Quick Menu. Perform the following options:
Delete a quick access link
- Click on the “trash” icon of the link to be deleted and confirm deletion.
Edit quick access link information
- Click on the gear icon of the corresponding link, then adjust the information: icon, title, hotkey, link.
- After that, save to update the new menu list.
Add custom JavaScript (JS)
Support for administrators to customize and manage JavaScript and CSS code for customization in Admin, Clients, or both. Integrated permission locking for editing each custom JavaScript and CSS code. Administrator with ID 1 can lock custom JavaScript and CSS code, preventing edits from other admins. This feature helps administrators ensure that custom scripts and CSS for the Perfex CRM interface remain unchanged.
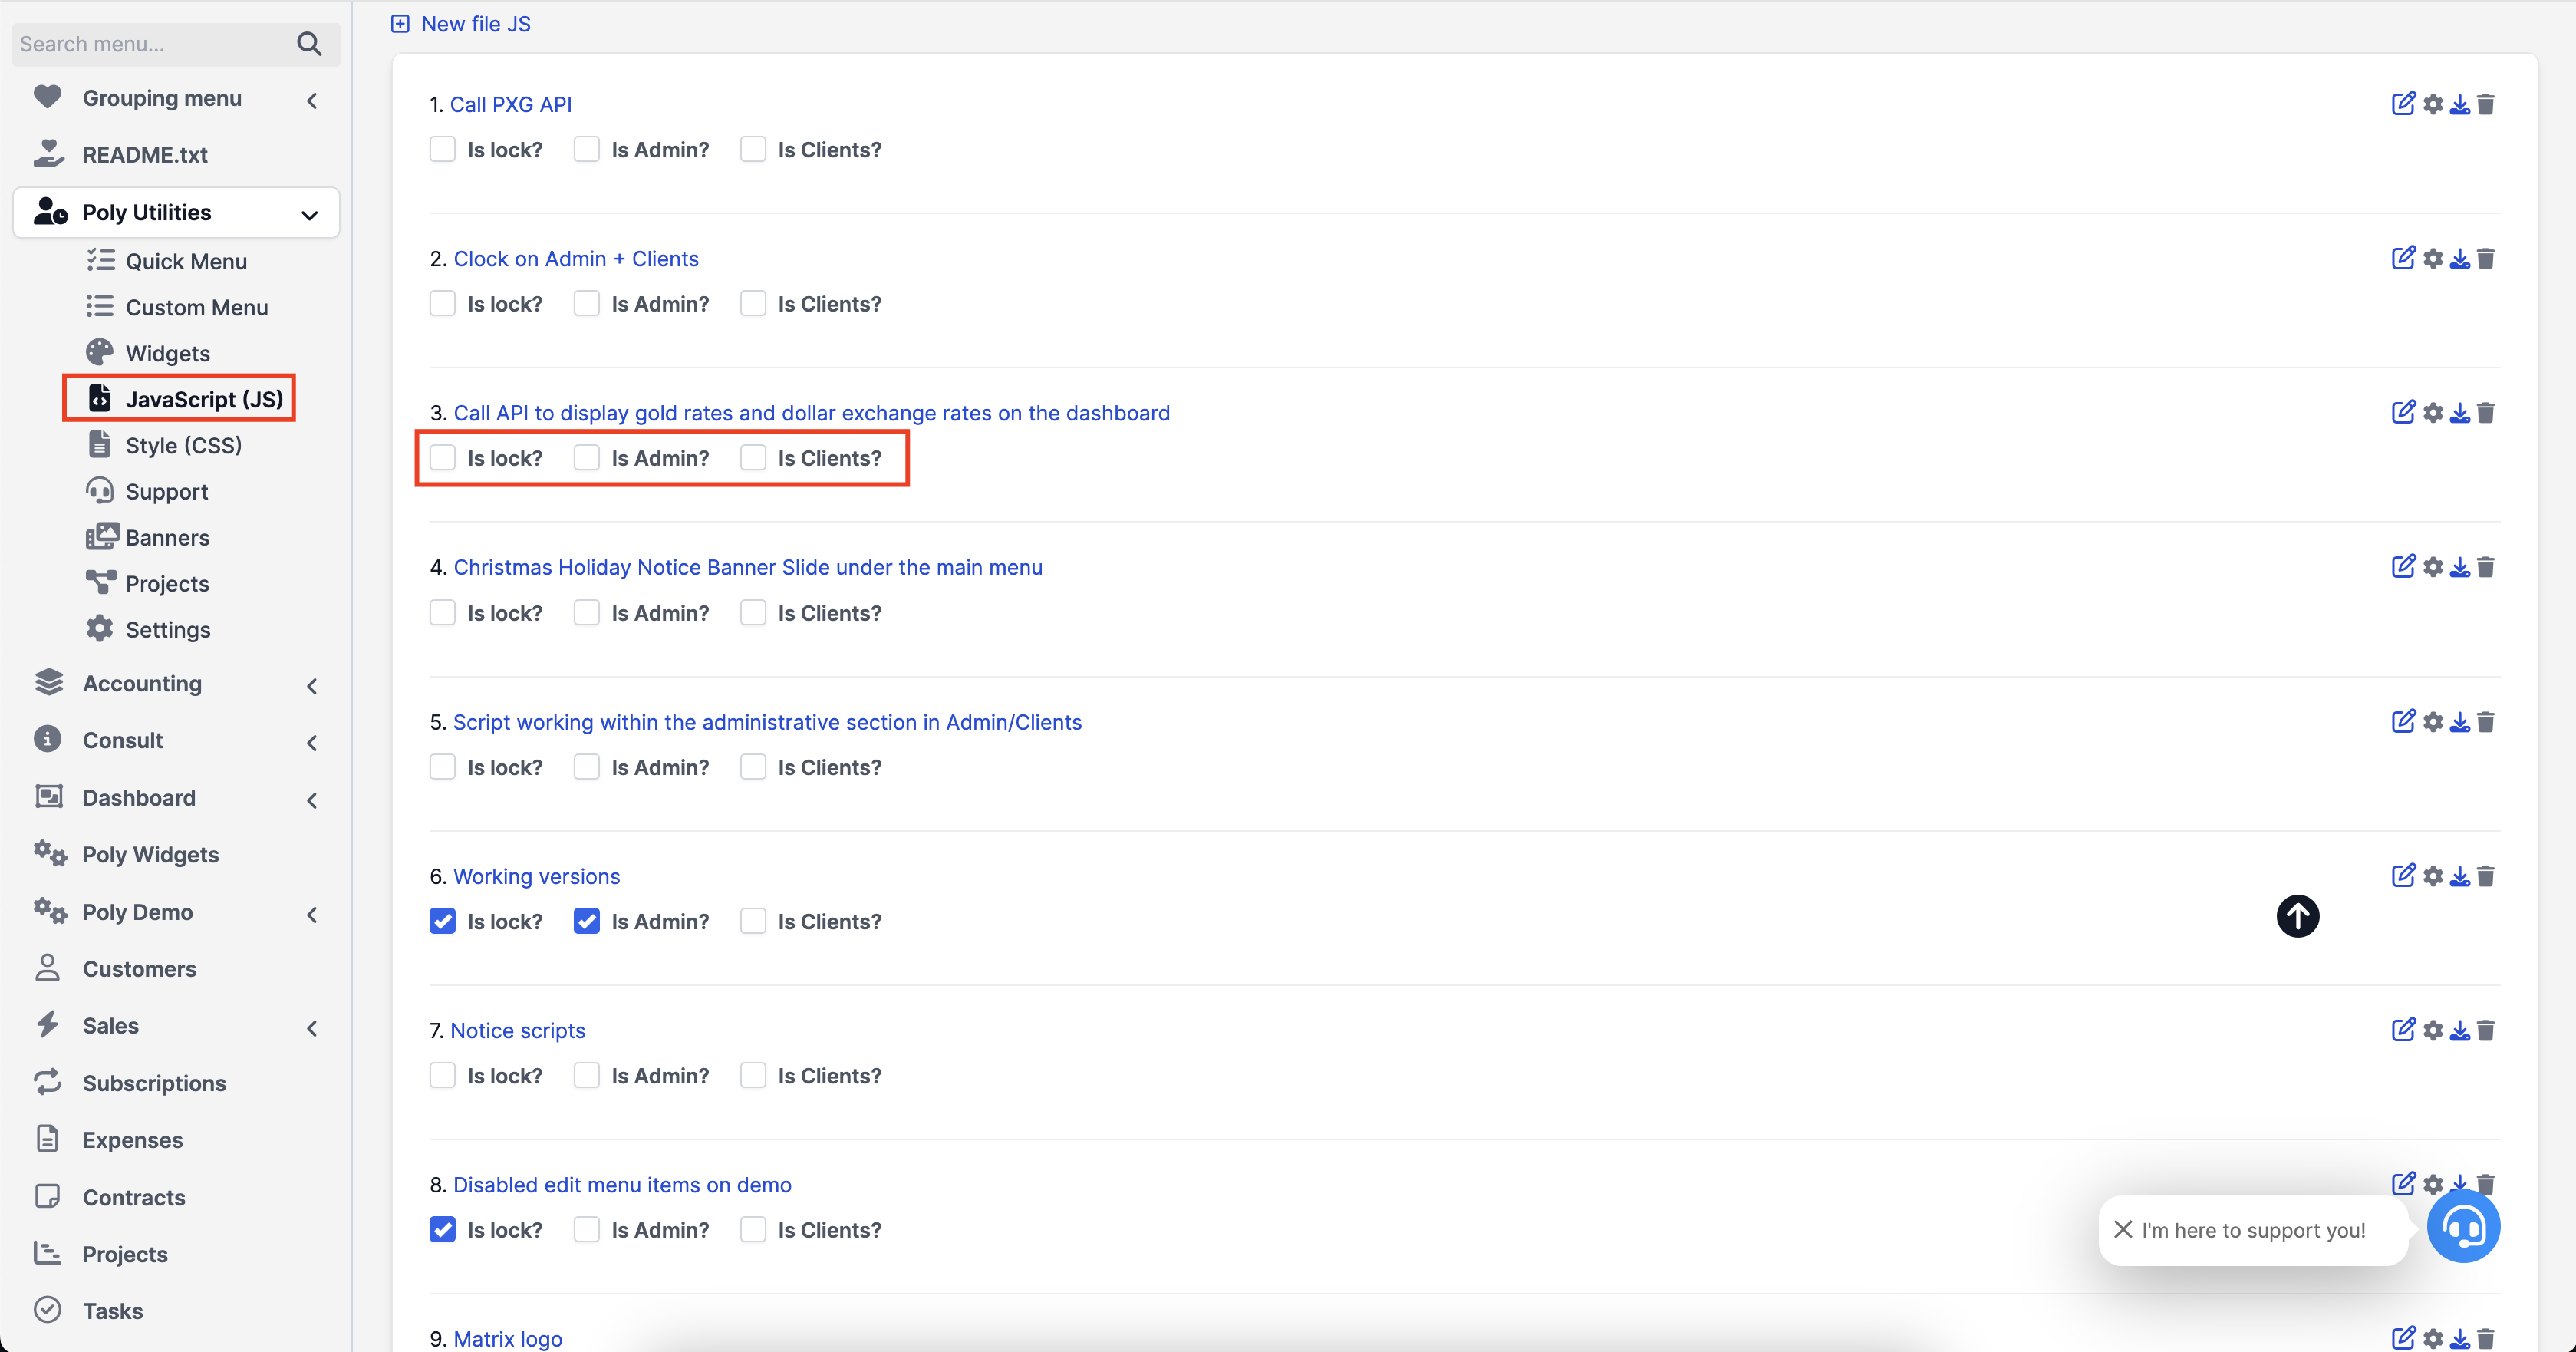
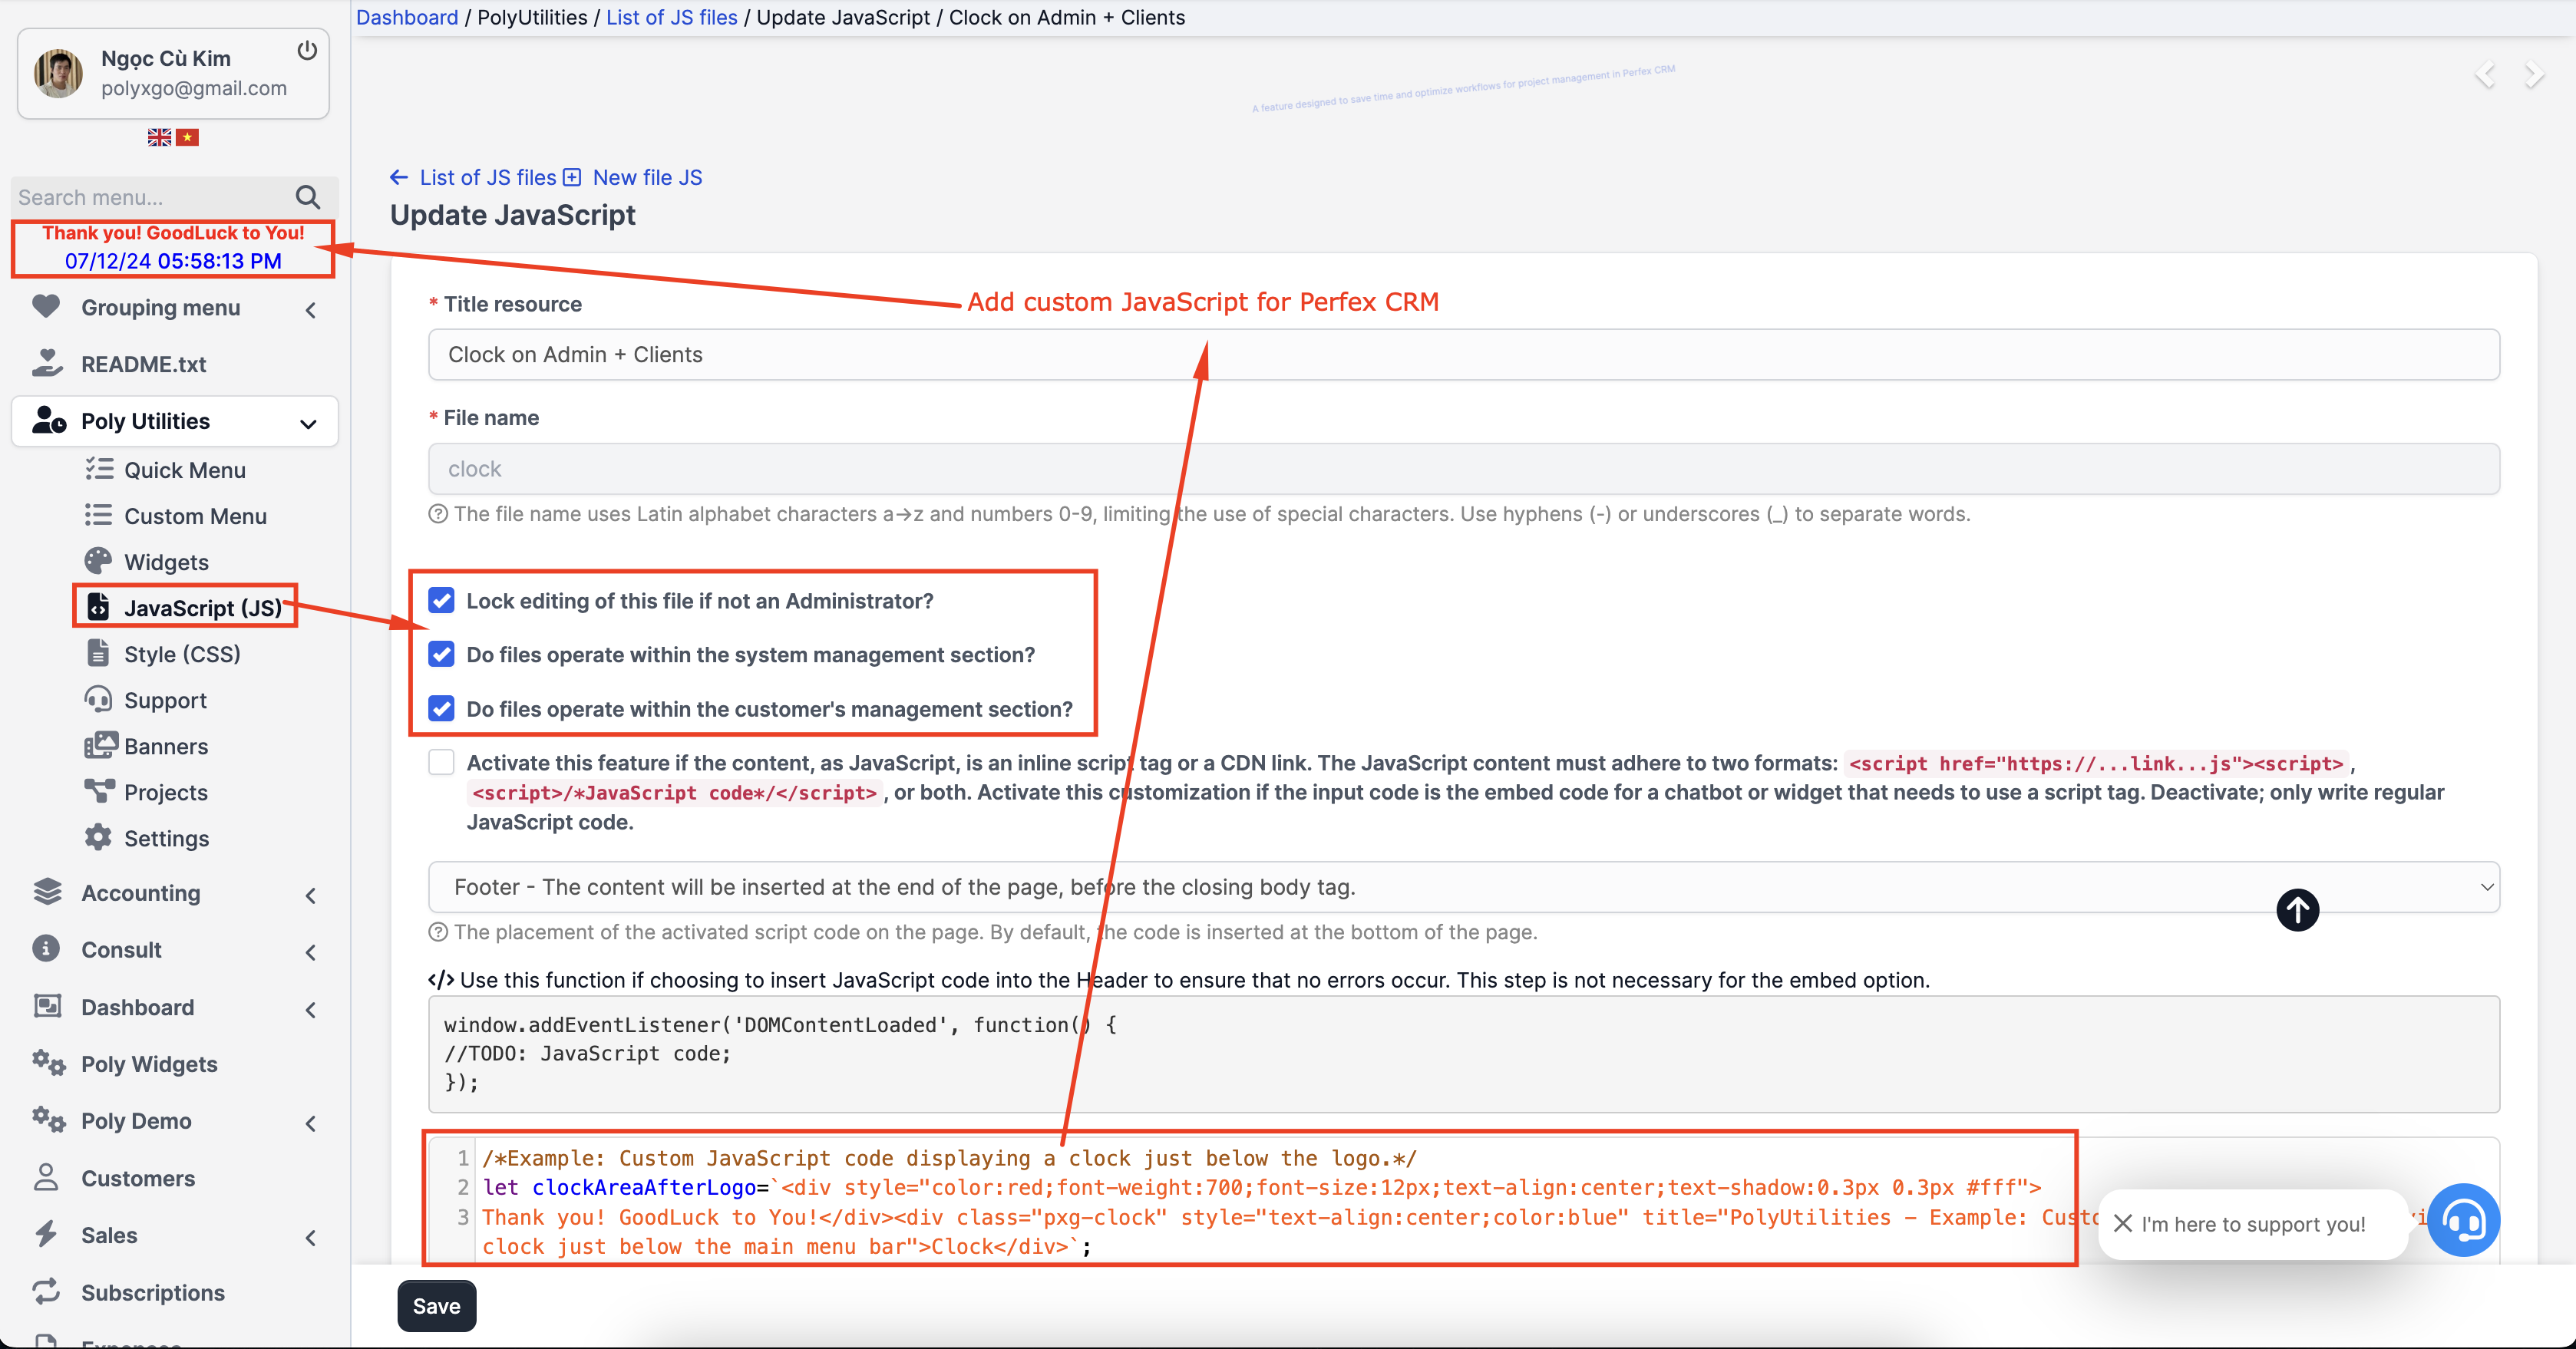
Access PolyUtilities > JavaScript (JS). Select New JS file. And enter the following information:
- Title resource: Name, descriptive title for code functionality. Example: Add clock displaying time on the toolbar.
- File name: Name of the file storing the code, using characters from a->z and numbers from 0-9. If needing word separation, use the hyphen character “-“.
- Check “Do files operate within the system management section?” if allowing the code to function within the admin management part.
- Check “Do files operate within the customer’s management section?” if allowing the code to operate in the customer and user management section.
- Select both if applying the code file across the entire system. Do not select if drafting the code.
Edit Custom JavaScript
- Access PolyUtilities > JavaScript (JS). In the list of created code, select the “edit” icon to edit the corresponding code. In the adjustment section, compose the code information and then Save.
Delete Custom JavaScript
- Access PolyUtilities > JavaScript (JS). In the list of created code, click on the “trash” icon corresponding to the code and confirm deletion.
Add custom Style (CSS)
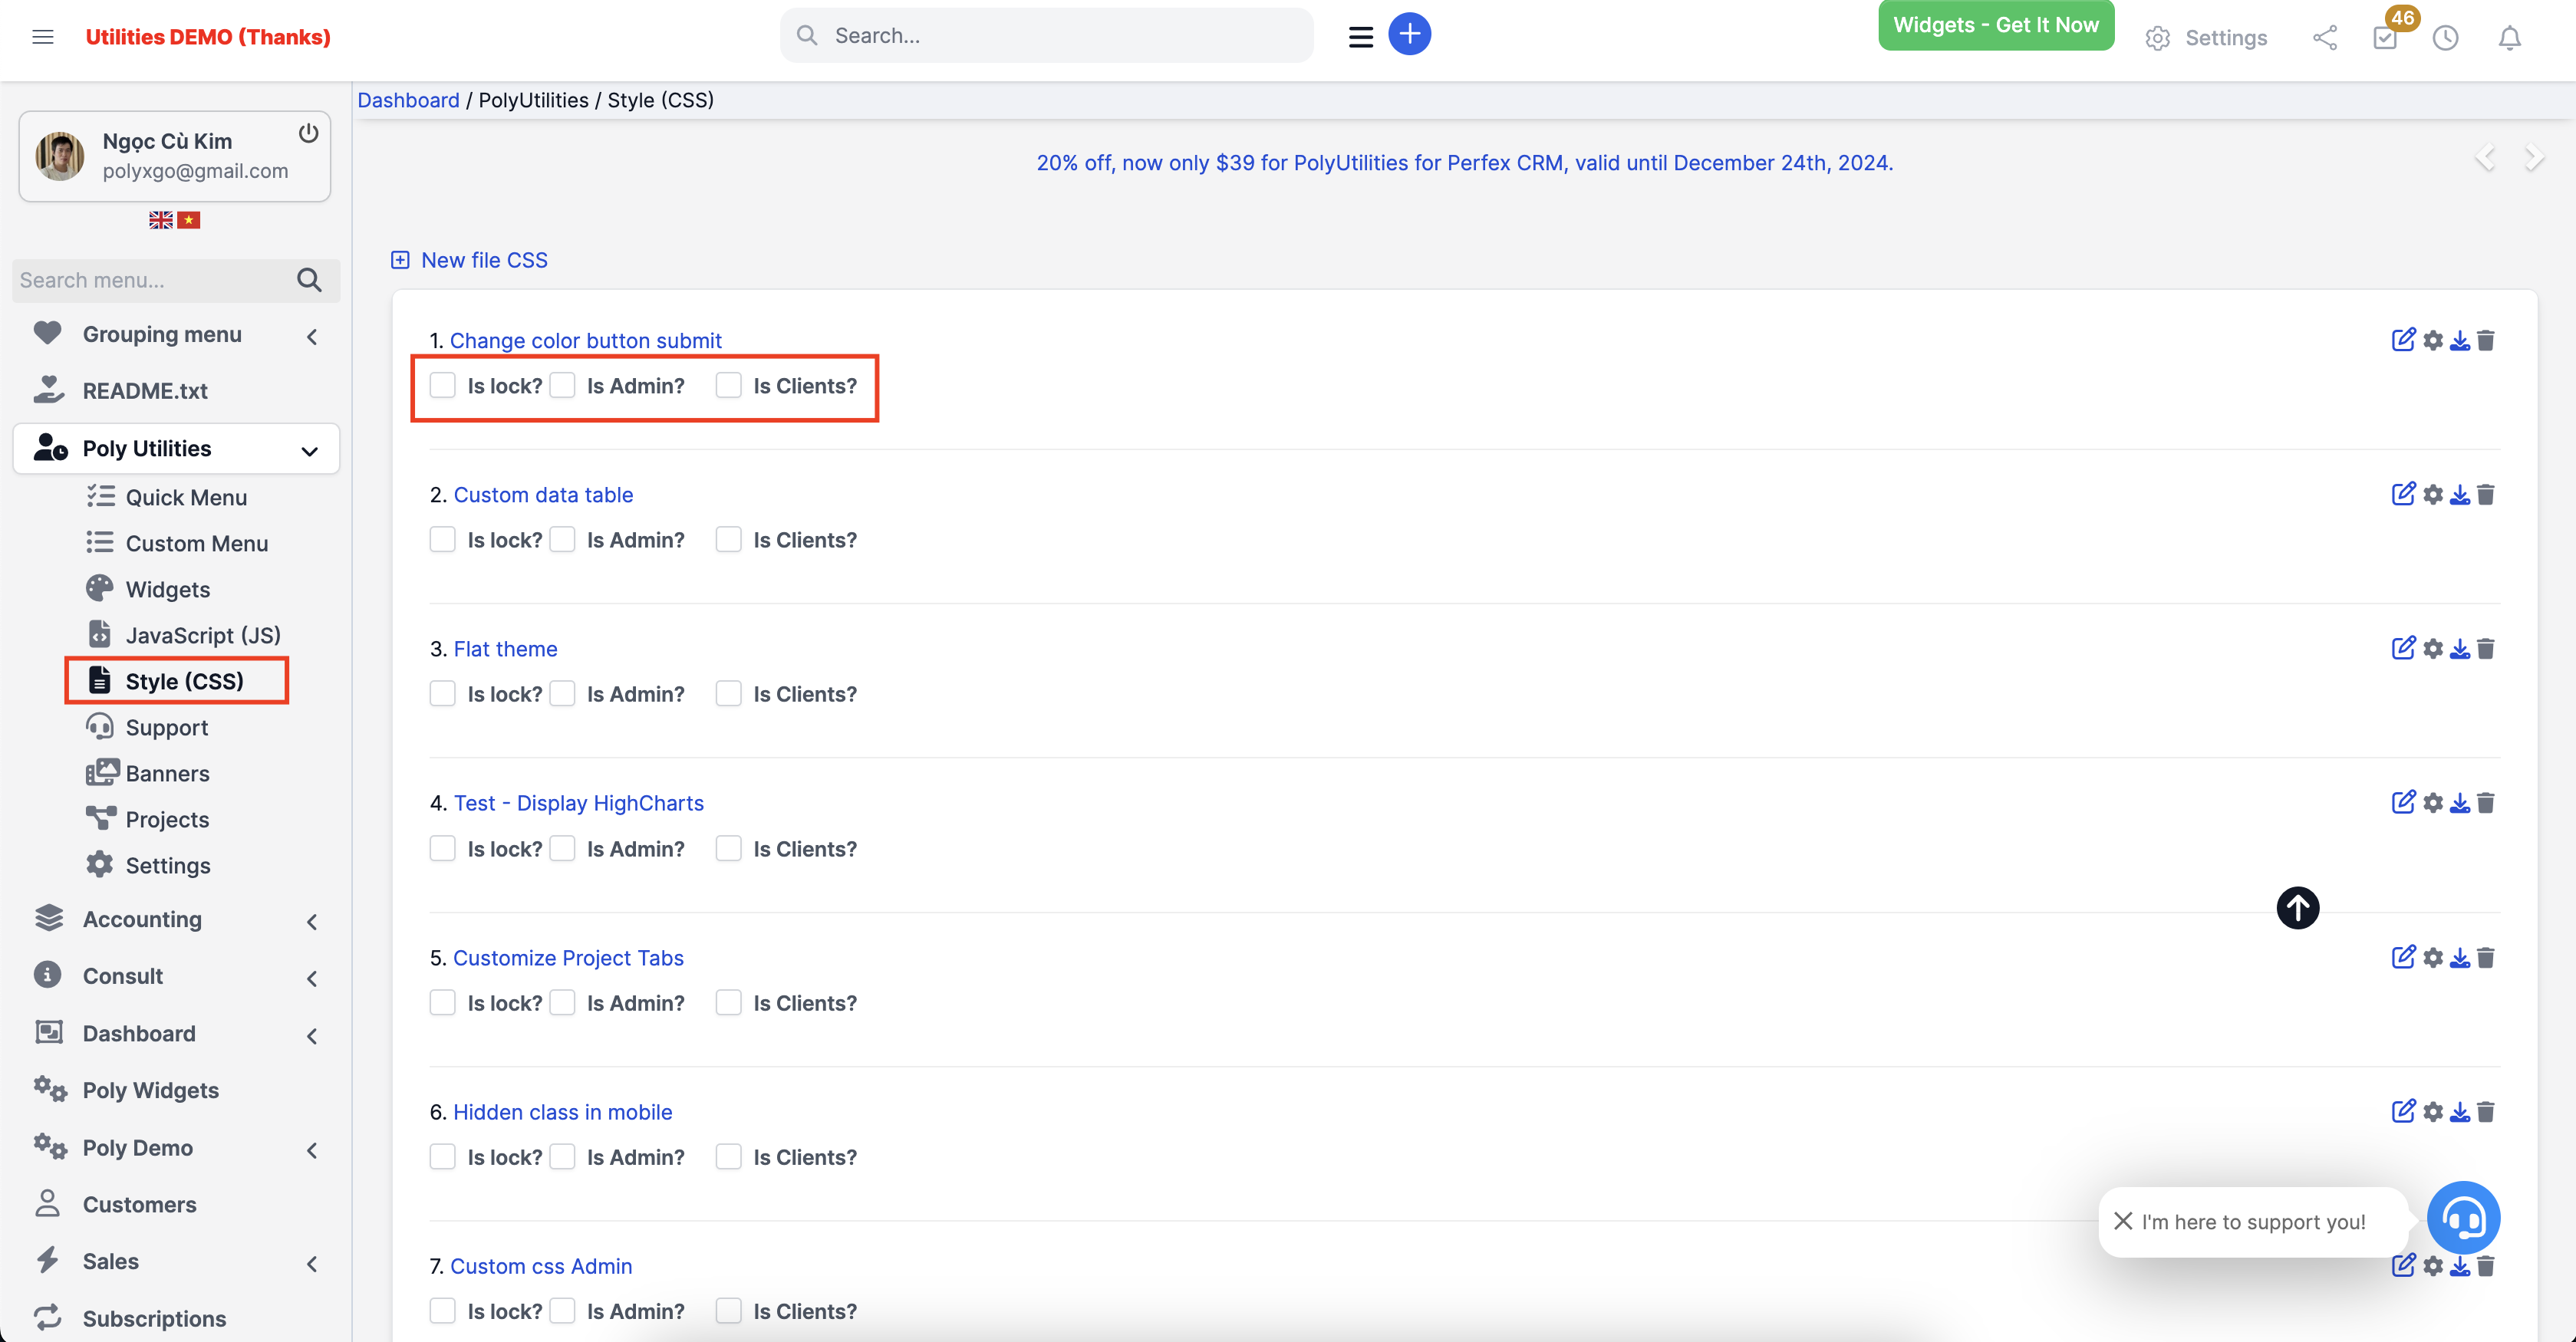
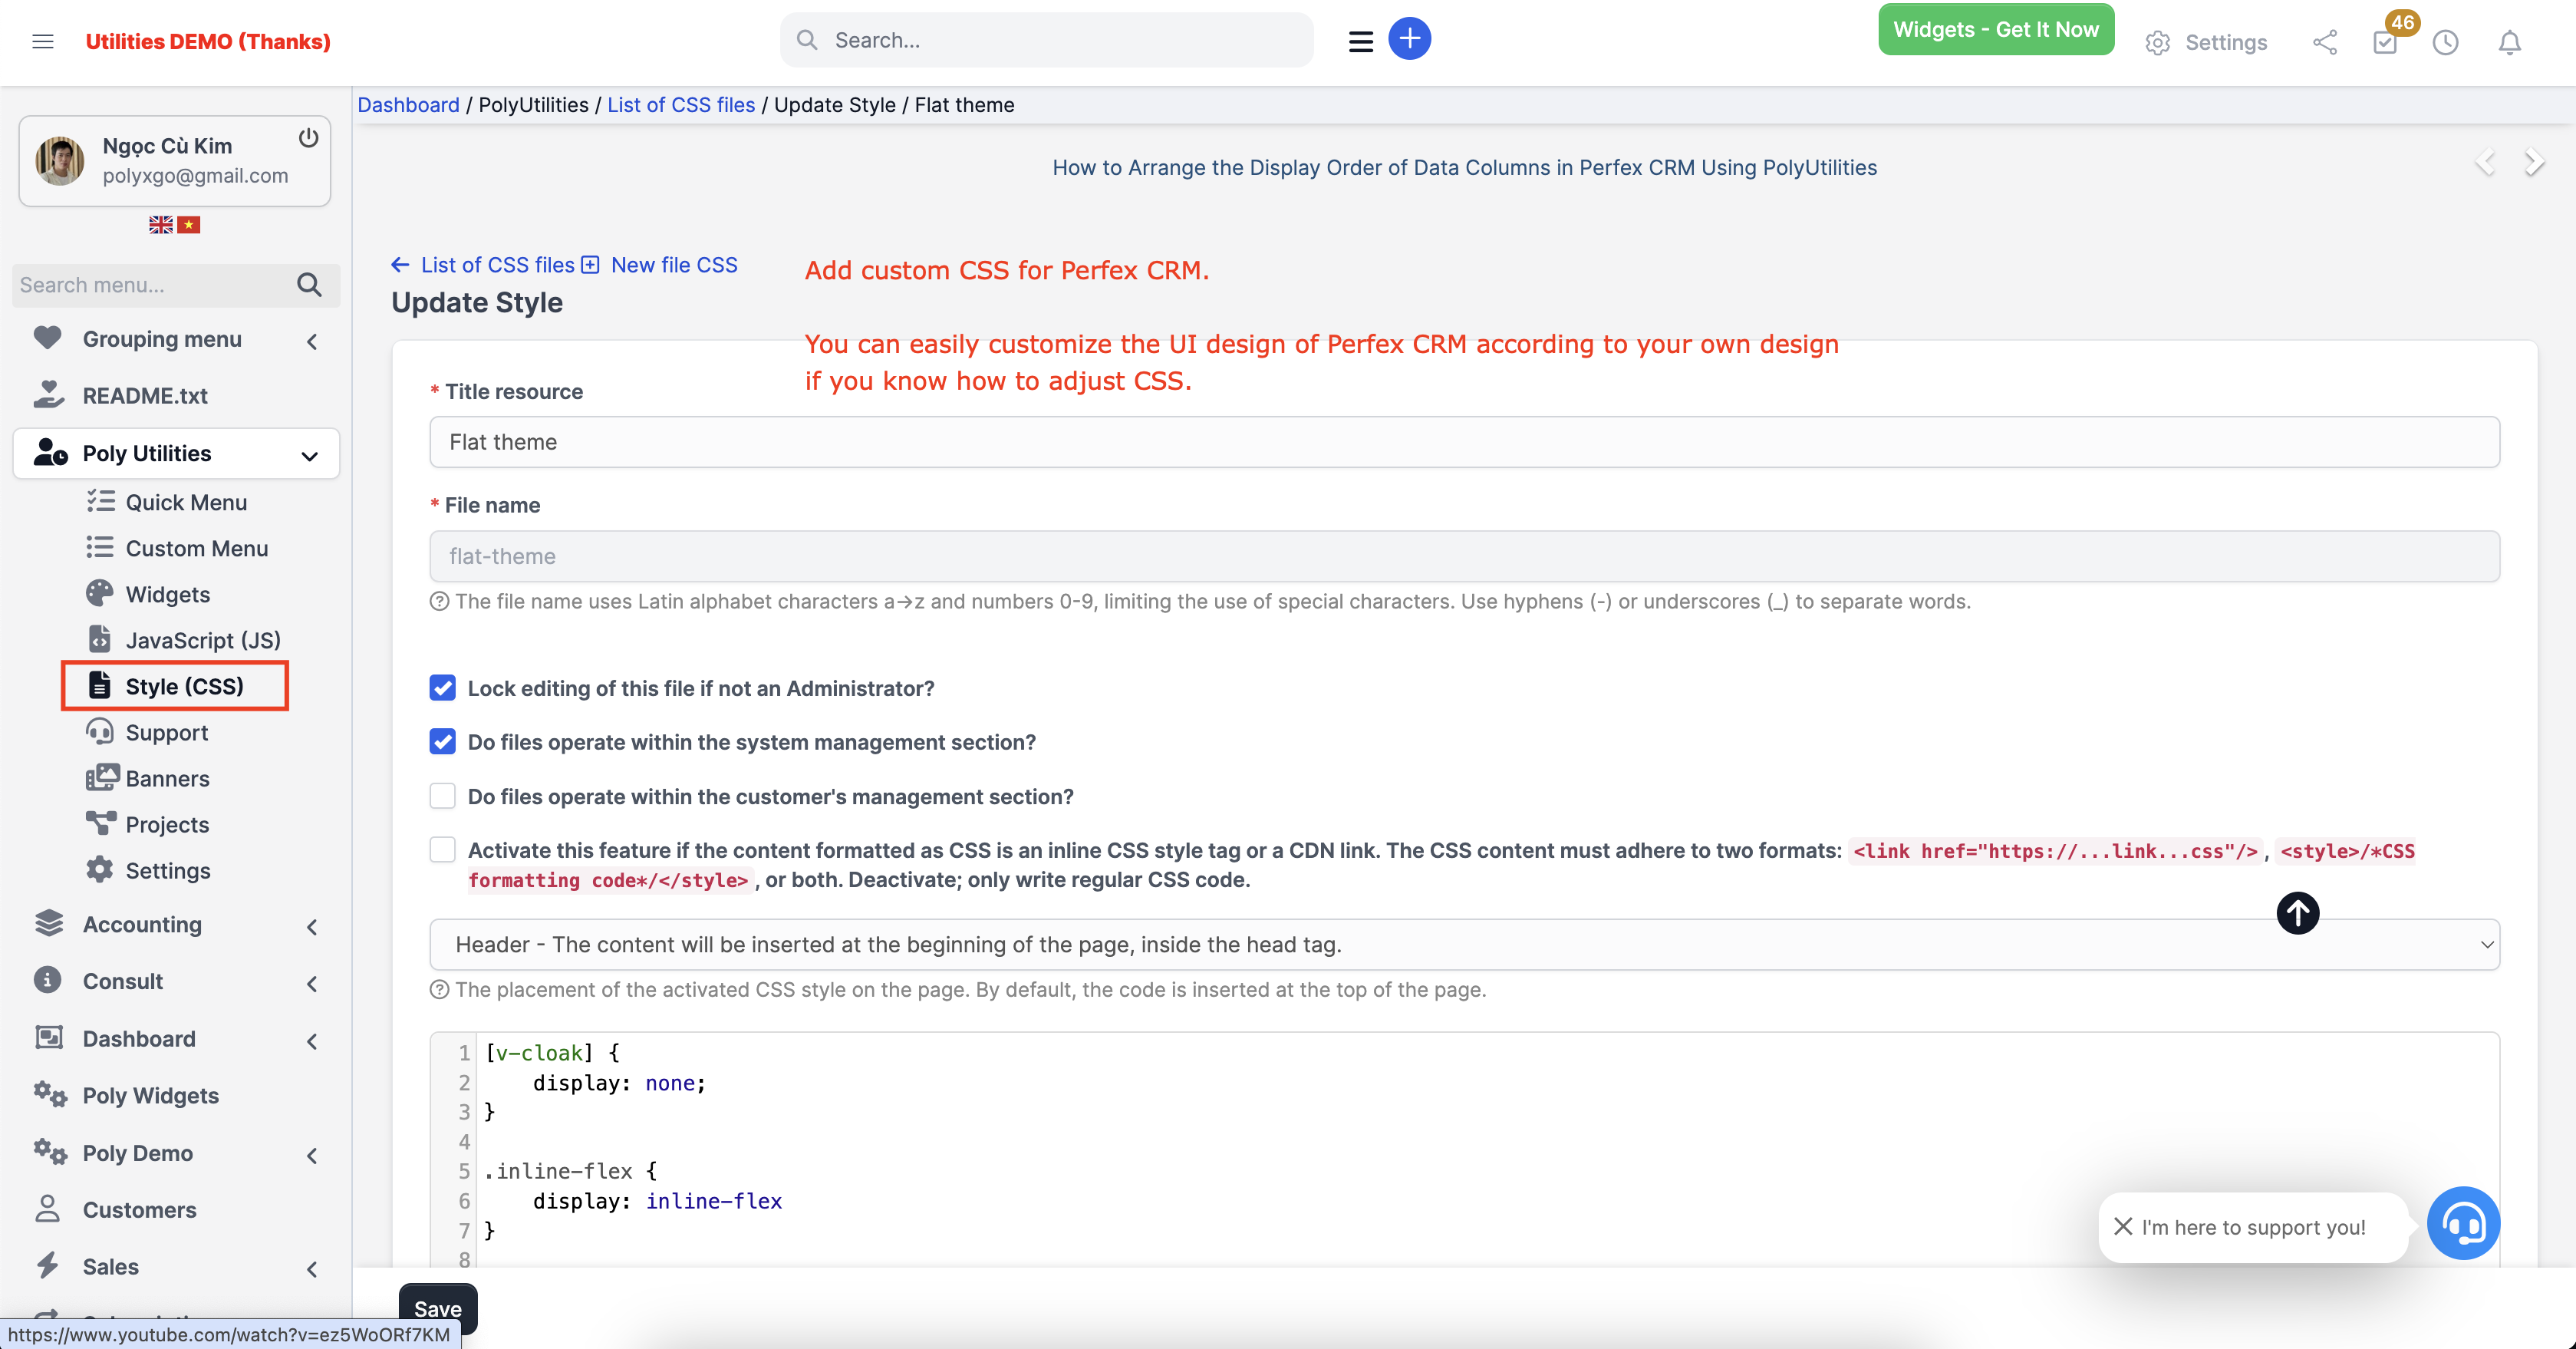
Access PolyUtilities > Style (CSS). Select New CSS file. And enter the following information:
- Title resource: Name, descriptive title for applied CSS formats. Example: CSS custom table.
- File name: Name of the file storing the CSS format, using characters from a->z and numbers from 0-9. If needing word separation, use the hyphen character “-“.
- Check “Do files operate within the system management section?” if allowing the CSS format to function within the admin management part.
- Check “Do files operate within the customer’s management section?” if allowing the CSS format to operate in the customer and user management section.
- Select both if applying the CSS format file across the entire system. Do not select if drafting the format.
Edit Custom CSS Format
- Access PolyUtilities > Style (CSS). In the list of created CSS formats, select the “edit” icon to edit the corresponding format. In the adjustment section, compose the format information and then Save.
Delete Custom CSS
- Access PolyUtilities > Style (CSS). In the list of created CSS formats, click on the “trash” icon corresponding to the format and confirm deletion.
Operations
- Breadcrumb: added breadcrumb support for Perfex CRM. Supported modules: projects, contracts, expenses, knowledge base, proposals, estimates, invoices, payments, credit notes, and items.. This list is updated based on integration and customer requests.
- Integrating a feature to support customizing the display of icon lists when collapsing the sidebar menu. (v1.0.4)
- Integration of using the Ctrl+S shortcut to save content while editing: Contracts, Projects, Project Notes, adding custom JavaScript, and CSS. These contents can often be lengthy during editing, and supporting the Ctrl+S shortcut will ensure safer and more convenient content storage compared to clicking the Save button. (v1.0.1)
- When adjusting Project information and saving, it won’t redirect to the view page. Currently, after saving Project information, it redirects to the information page, making it inconvenient to continue editing. You would need to edit the project again to access the editing section. (v1.0.1)
- Activate confirmation pop-ups for deleting notes. Prevent accidental deletion of notes with no chance of recovery.
- Fix the top menu bar in the administration section.
- Integrate a table of contents creation feature in contract drafting, articles. Assist administrators in quickly navigating to relevant sections without spending time searching.
- Integrate extended function buttons: copy customer phone numbers, emails. Integrated into tables displaying phone numbers, emails.
- Integrate a scroll-to-top feature in the administration section. Assist administrators in quickly moving to the top of the page. Support for drag-and-drop to adjust the display position of the Scroll To Top button icon. This occurs on sites using additional modules with fixed icons on the page, such as chat plugins like WhatsApp.
- And other features that we will continually research and integrate in the future. For example: swift switching from notes to projects, contracts, task assignments.
Settings
Settings (PolyUtilities > Settings)
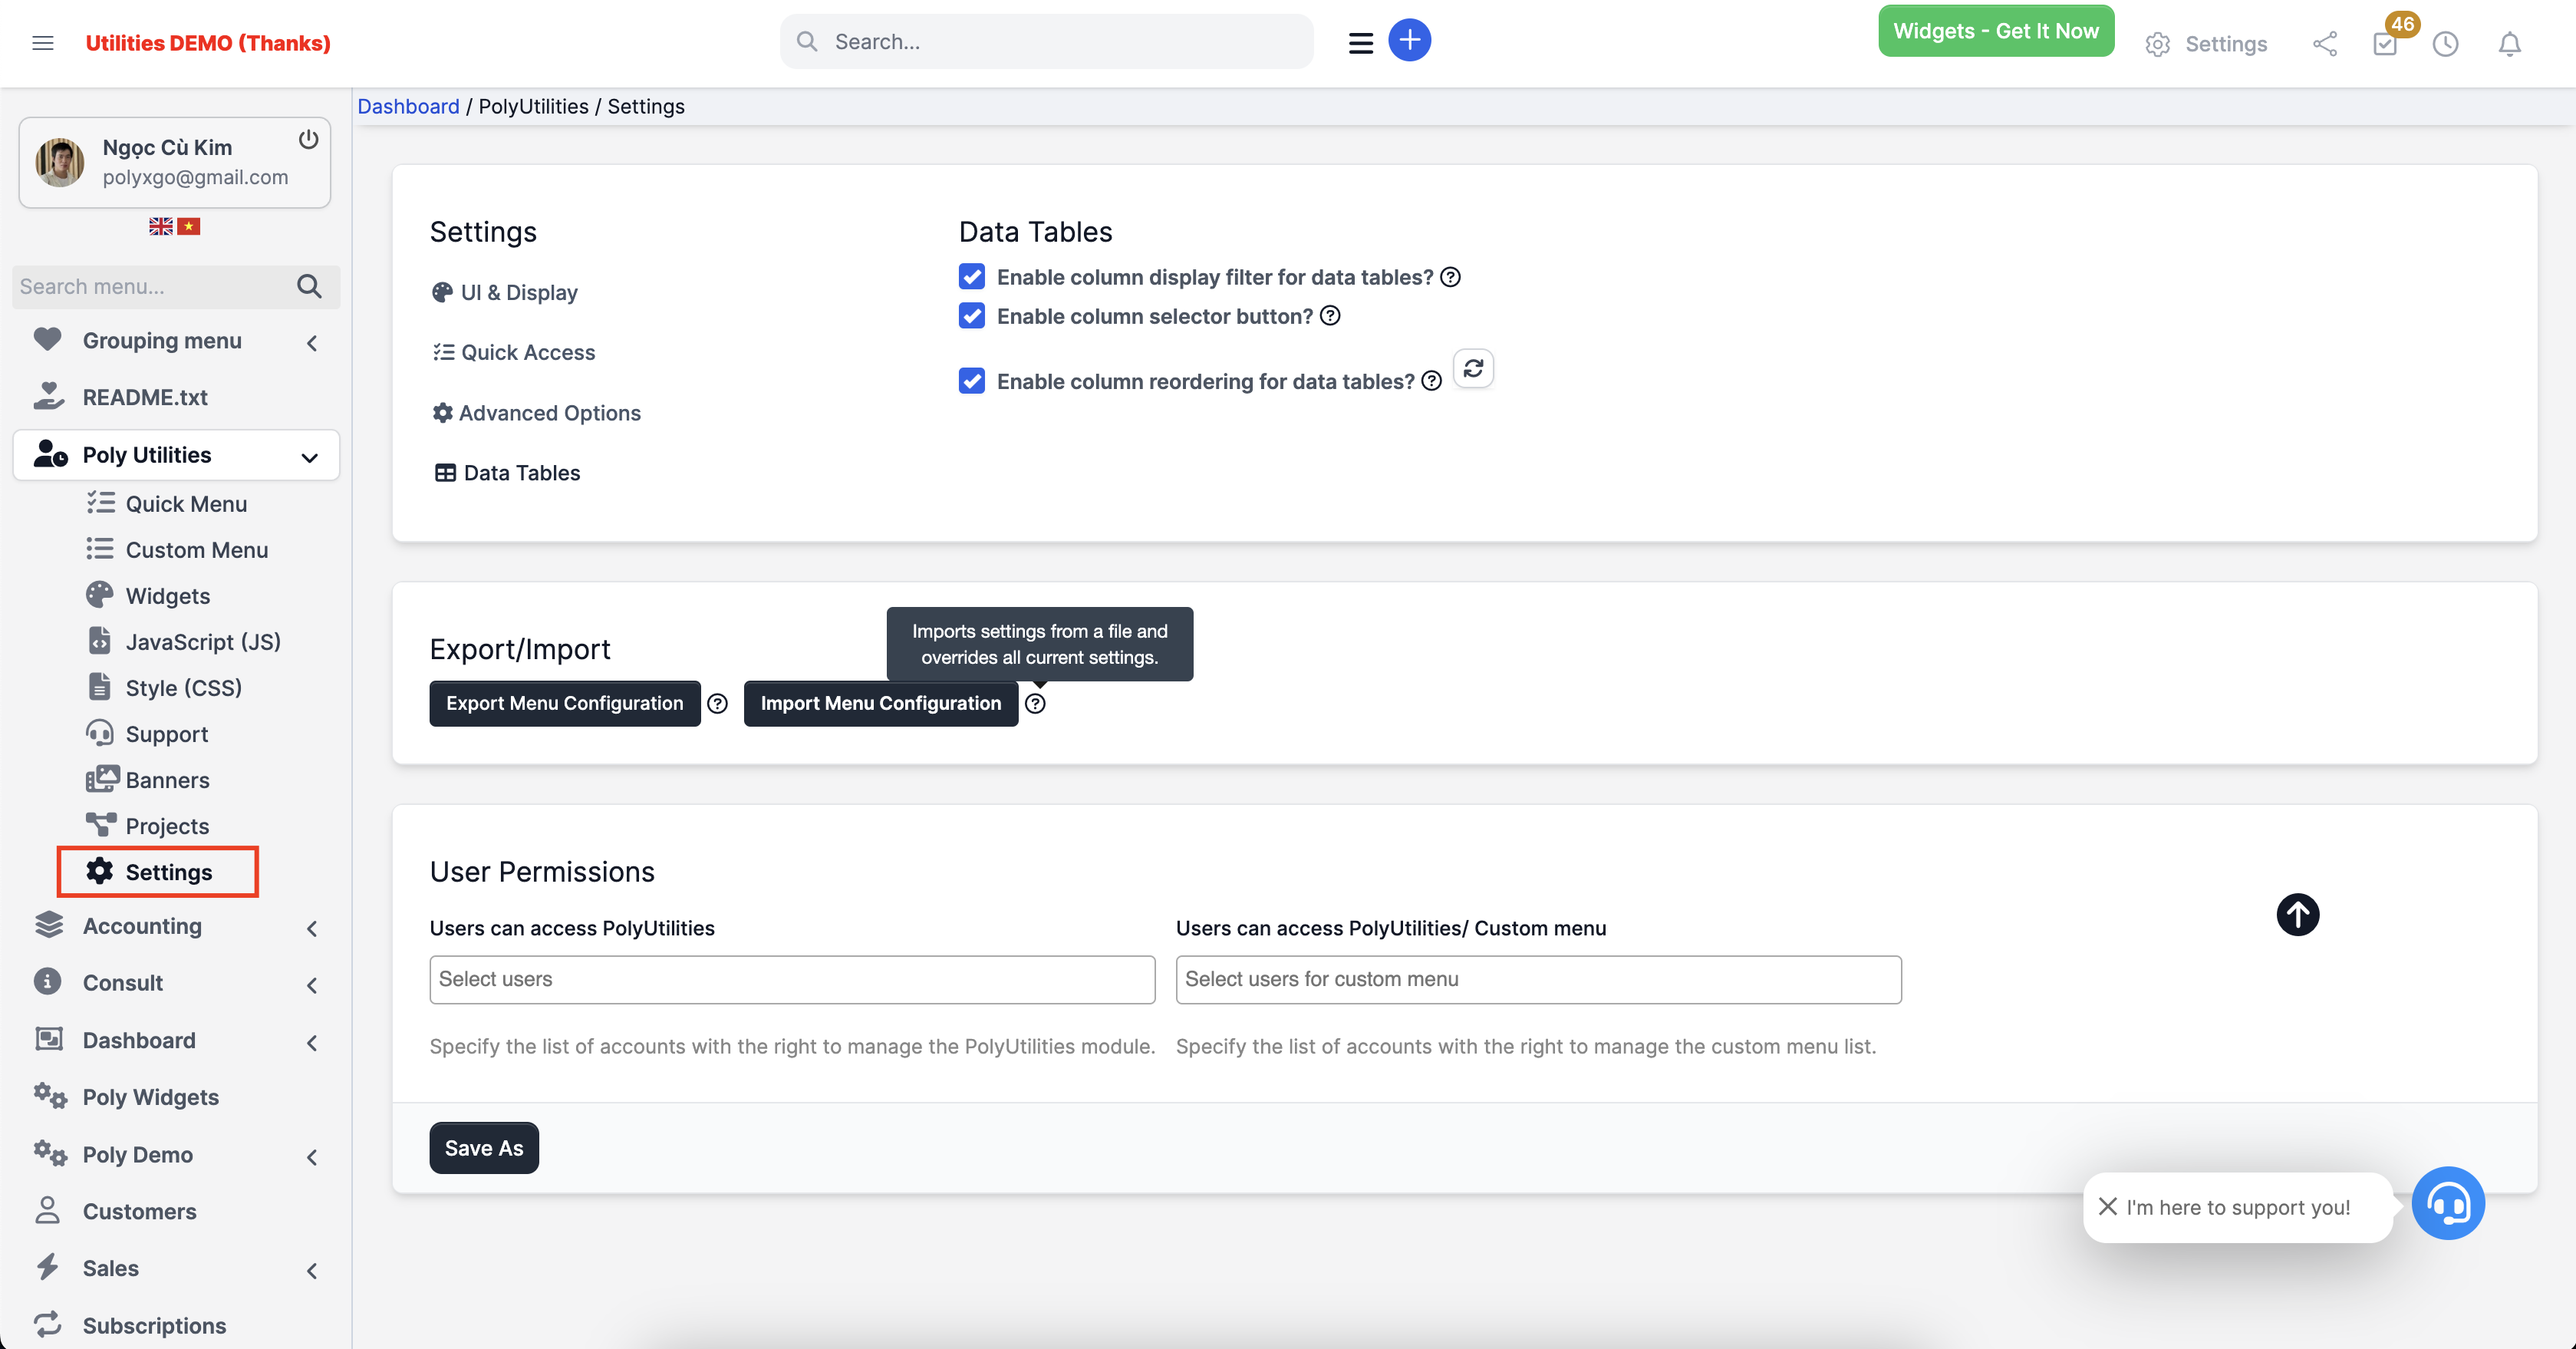
- User can access PolyUtilities: Specify the list of accounts with the right to manage the PolyUtilities module.
- Users can access PolyUtilities/ Custom menu: Specify the list of accounts with the right to manage the custom menu list.
- Enable Sticky Menu? Customize to enable the Sticky Menu feature within the administration section.
- Enable collapsed icon-only Sidebar Menu? Enable the integration of a feature that supports customizing the display of icon lists when collapsing the sidebar menu.
- Enable quick access to the table of contents in the editor section? Customize to enable the Table of Contents feature for content using editors such as projects, articles, supporting faster content creation.
- Enable the use of custom JavaScript (JS)? Customize to enable the operation of the list of custom JavaScript codes at PolyUtilities > JavaScript (JS)?
- Enable the use of custom CascadingStyleSheets (CSS)? Customize to enable the operation of the list of custom CSS codes at PolyUtilities > Style (CSS)?
- Enable confirmation prior to deleting the note? Customize to activate a confirmation dialog for deletion action of notes.
- Enable operation functions? Customize to activate extended functionalities such as an edit button while viewing project information, copying phone numbers, emails within tables displaying this information, and additional features to be updated.
- Enable scroll to top? Customize to activate the scroll to top button within the administration section.
FAQs (Frequently Asked Questions)
Can I create multiple custom JS/CSS codes?
Yes, the utility supports creating multiple JavaScript and CSS files. Please ensure compatibility between these files and other codes within the system to prevent errors.
Can I set permissions within the module?
Yes, the utility supports permission settings: view, create, edit, delete for supported features.
Can I request additional desired features?
Certainly, as this module integrates additional utilities to assist administrators more conveniently while using the Perfex CRM system. For useful feature suggestions, we will gradually incorporate them into future updates. For especially beneficial features, we will integrate them into the nearest update.
Why doesn’t the utility use shortcuts like Ctrl, Shift, Alt, Command?
Currently, by default, Perfex CRM developers have integrated some shortcuts to meet certain needs within the system. You can refer to the list of shortcuts supported by Perfex CRM at the following at “Hotkeys for Perfex CRM“.
Allowing the setup of such shortcuts can lead to conflicts. Additionally, browser shortcuts may also conflict, so the utility chooses less common shortcuts to facilitate custom link redirection operations.
However, in subsequent updates, we will also provide a list of some operations that will use shortcuts supporting Ctrl, Shift, Alt, Command.
You can purchase PolyUtilities on which websites?
You can only purchase PolyUtilities modules on platforms within the Envato system. We exclusively sell some products there and provide customer support through Envato’s channels. Any other resale channels are not permitted and not supported.
Aside from Envato’s main support channels, can I receive support through other channels?
Certainly, we operate and provide customer support through Envato’s support channels. Additionally, in cases requiring more urgent support, you can reach us through the following channels:
- Support & Feature Request Group for PolyUtilities.
- Email: info@polyxgo.vn
Thank you
Once again, thank you so much for purchasing the PolyUtilities module for Perfex CRM. We are delighted to assist you with any inquiries related to this module. You can leave your feedback at https://codecanyon.net/user/polyxgo. We will provide support as soon as we receive your information.
Version History
...


 Tiếng Việt


